IPL के बाद टीवी खरीदना हो सकता है महंगा, जानें कंपनियों की प्लानिंग
अगर आप स्मार्ट टीवी खरीदने का प्लान कर रहे हैं तो हो सकता है कि आपको भविष्य में…

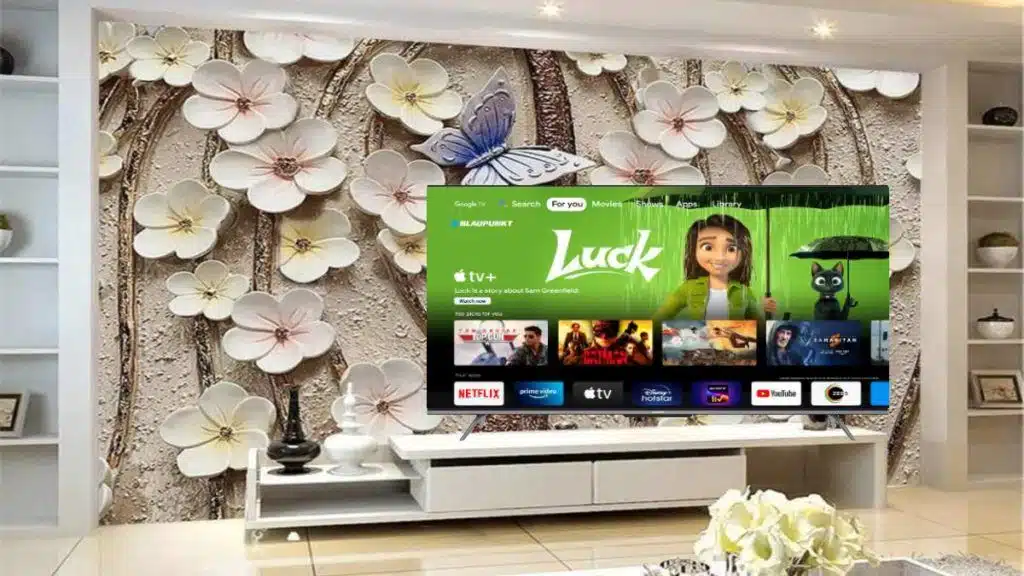
अगर आप स्मार्ट टीवी खरीदने का प्लान कर रहे हैं तो हो सकता है कि आपको भविष्य में…

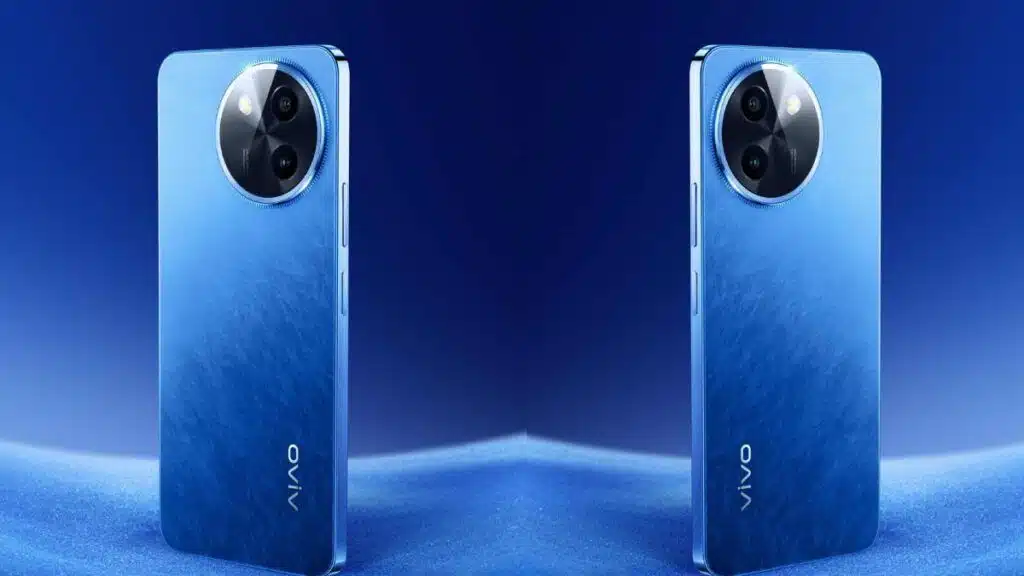
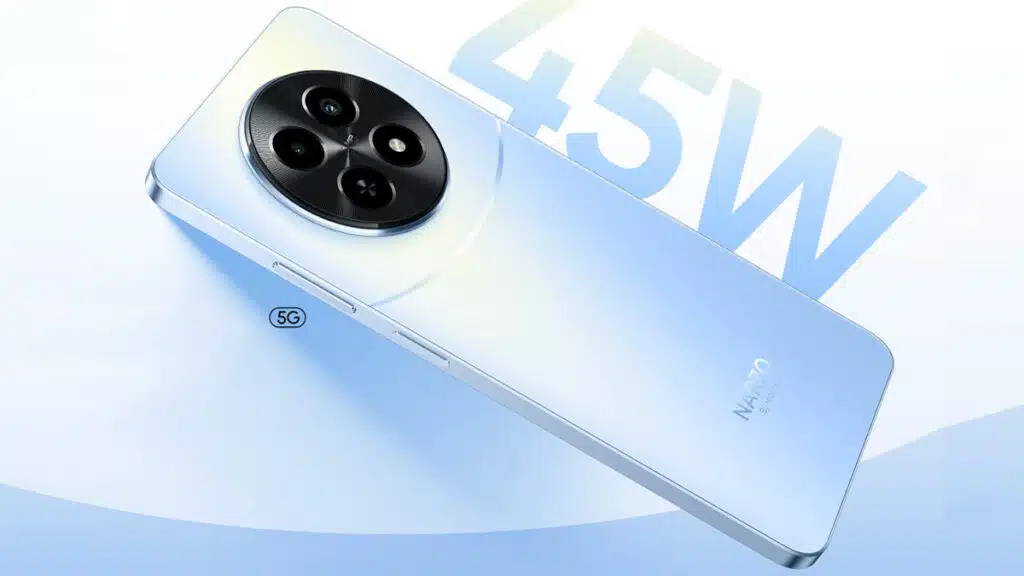
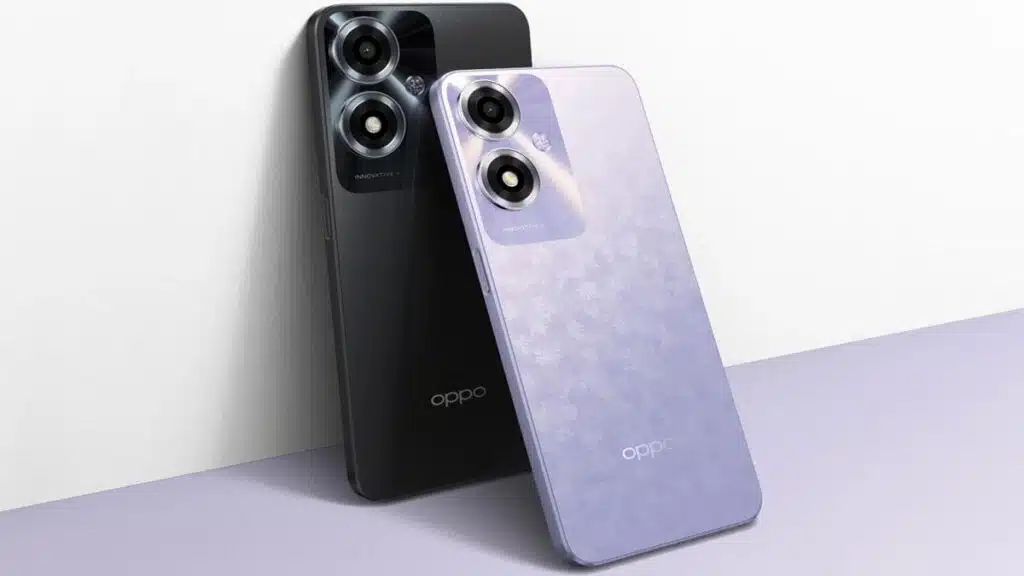
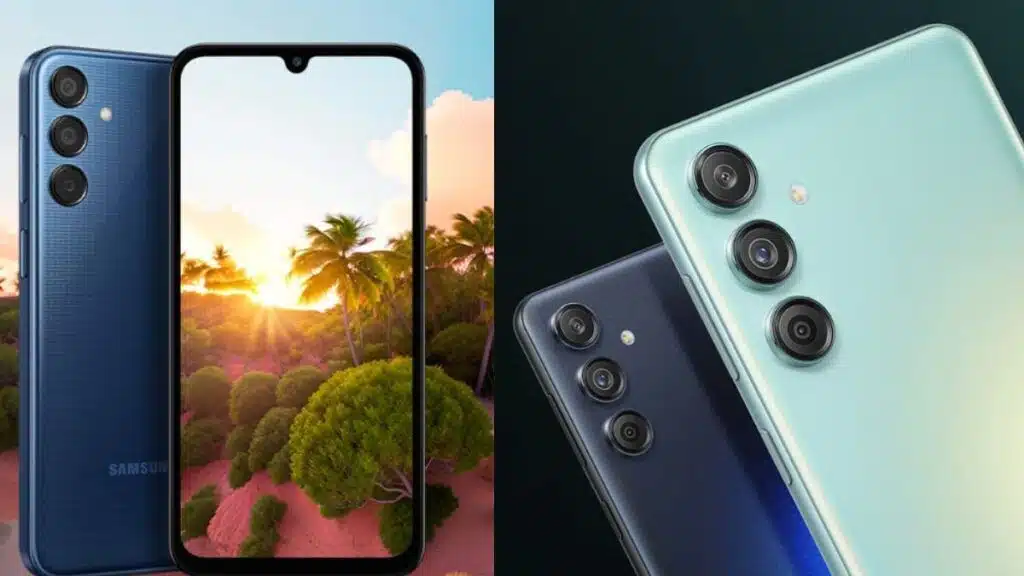
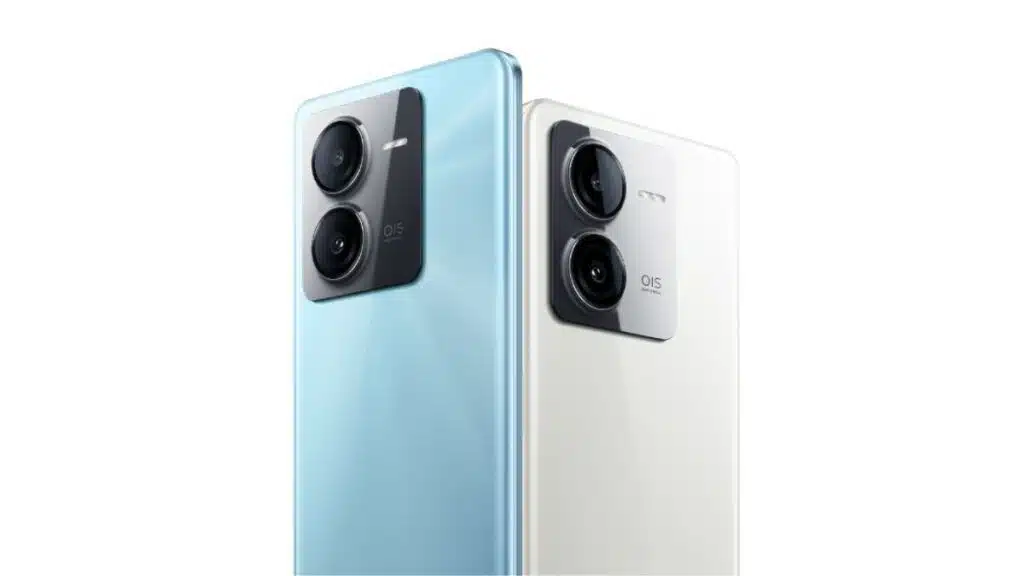
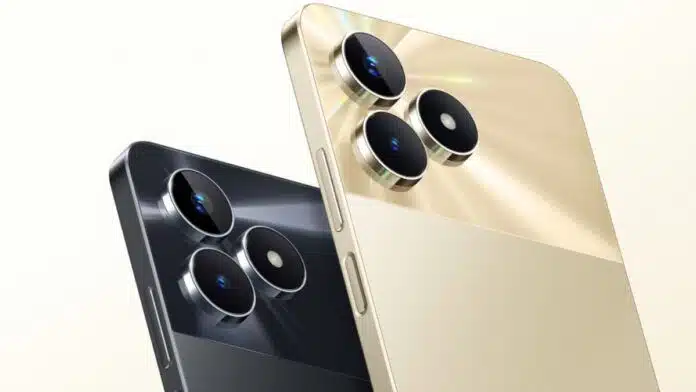
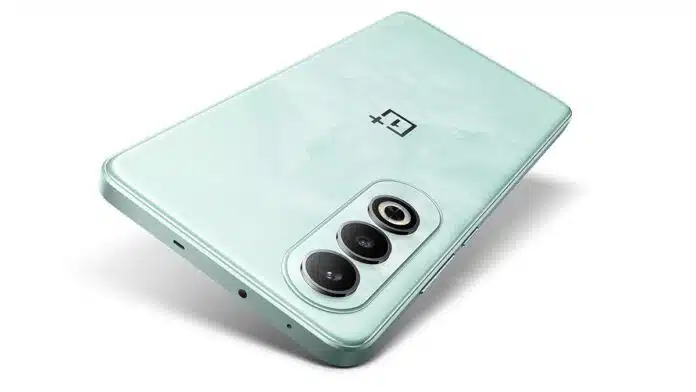
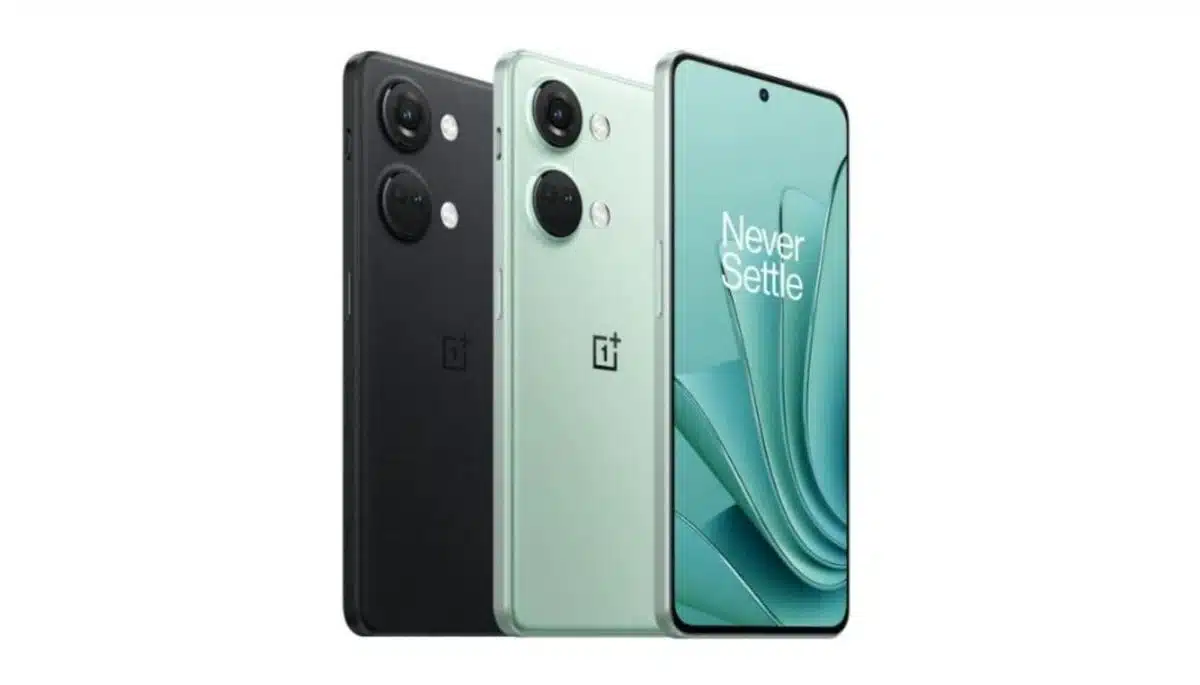
नया Vivo Y38 5G Vivo के 5G स्मार्टफोन उत्पाद पोर्टफोलियो में जोड़ा जाएगा। डिवाइस को पहले ब्लूटूथ SIG, CQC, बेंचमार्किंग साइट गीकबेंच…

भारत में यूपीआई (एकीकृत भुगतान इंटरफ़ेस, UPI) लेन-देन करने का सबसे तेज़ और आसान तरीका है। जनवरी 2024 तक, UPI के माध्यम…
Honor ने फरवरी महीने में अपना नया स्मार्टफोन Honor X9b 5G लॉन्च किया था। कंपनी इसे करीब 26,000…

भारतीय बाजार में जब भी 4जी कीपैड फोन की बात होती है तो रिलायंस के जियोफोन का जिक्र…
विवो कल ही मैंने कहा था कि मैं भारत में रहने जा रहा हूं.वी30‘सीमा का विस्तार होने जा रहा है और इसके…

सैमसंग के फोल्डेबल स्मार्टफोन रेंज में एक नया इजाफा हुआ है। ब्रांड ने पिछले साल गैलेक्सी फोल्ड 5…
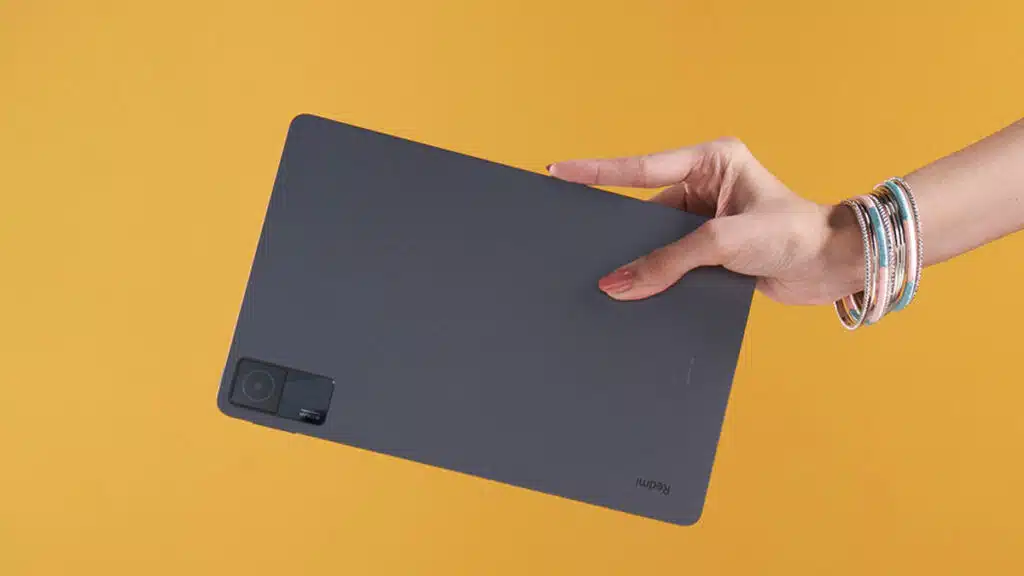
Xiaomi ने अपने यूजर्स के लिए एक दिलचस्प घोषणा की है। कंपनी ने अपने सस्ते टैबलेट डिवाइस रेडमी पैड की कीमत में…

सस्ते स्मार्टफोन से भारतीय उपभोक्ताओं पर दबदबा बनाने वाली कंपनी आईटेल ने एक नया लॉन्च किया है आईटेल…

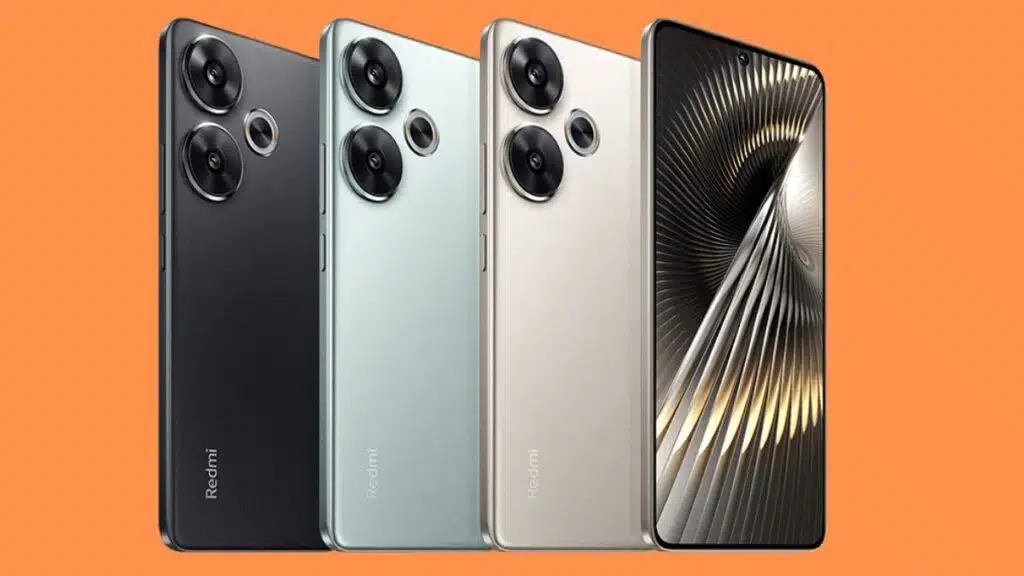
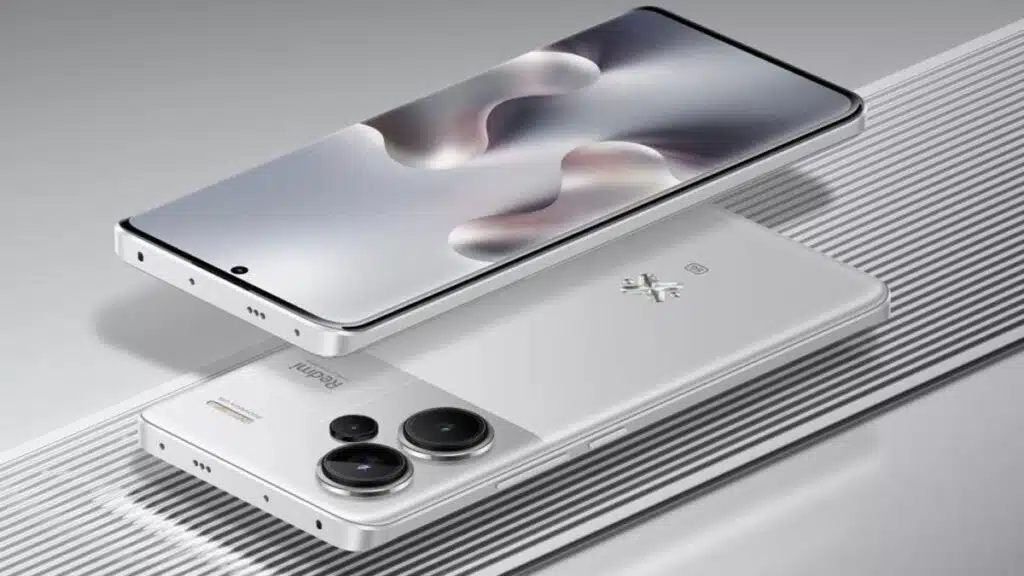
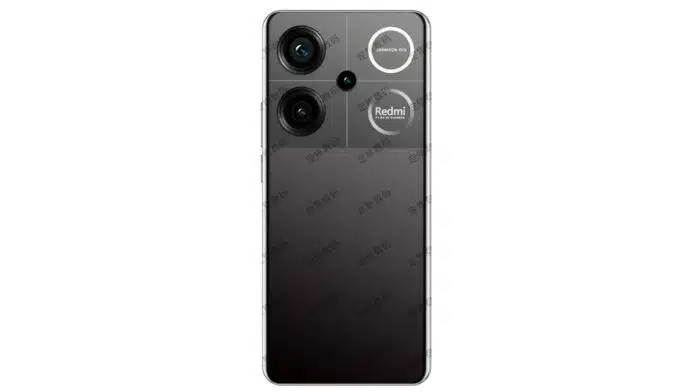
रेडमी 13 5जी फोन से जुड़ी कुछ अहम जानकारी सामने आई है। कहा जा रहा है कि यह मोबाइल फोन जल्द ही…
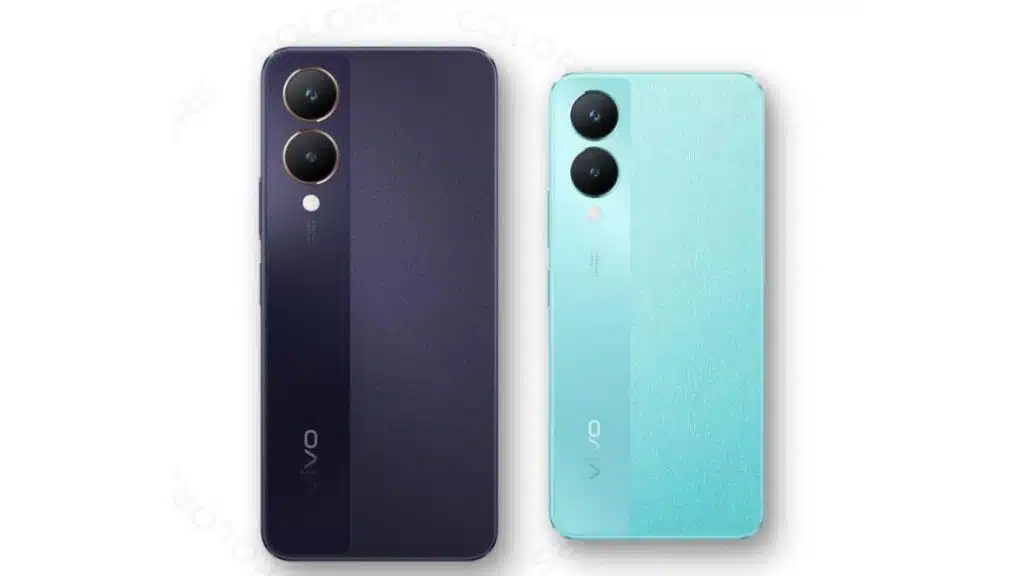
वीवो चीन में अपनी Y-200 सीरीज का विस्तार करने जा रही है। इसके तहत Vivo Y200i 5G मॉडल…


16 जीबी रैम की ताकत के साथ वनप्लस ऐस 3वी यह स्मार्टफोन हाल ही में चीन में लॉन्च…

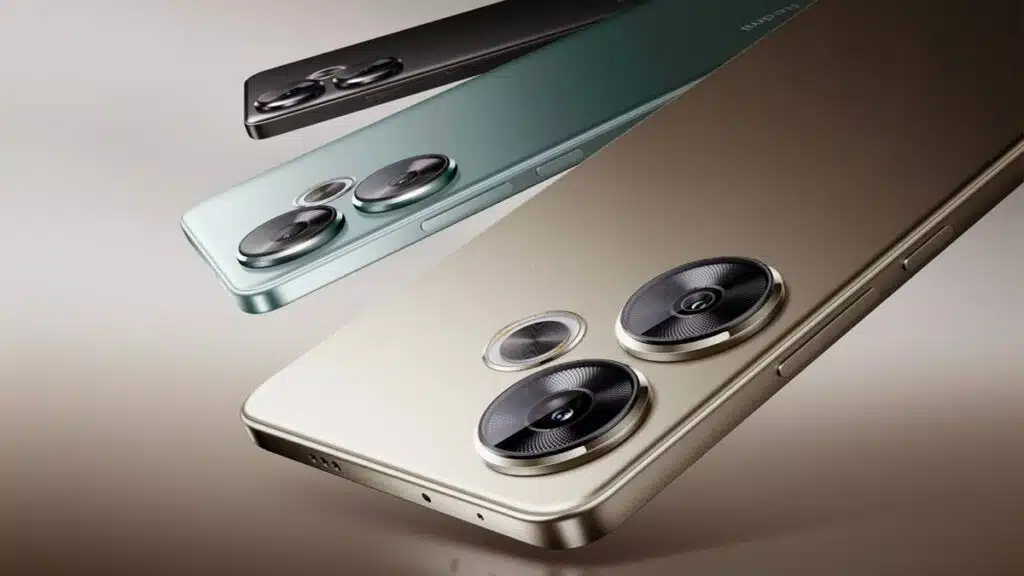
हुआवेई पुरा 70 सीरीज (छवि क्रेडिट: हुआवेई) Huawei ने आधिकारिक तौर पर Pura 70 फ्लैगशिप सीरीज लॉन्च कर…

पीएम किसान सम्मान निधि योजना (पीएम किसान सम्मान निधि योजना) केंद्र सरकार की योजना, जिसके तहत पात्र किसान एक वर्ष में 6,000…
Vivo ने 2024 की शुरुआत में अपना नया 5G स्मार्टफोन Y28 लॉन्च किया था। वहीं, अब खबरें आ…

अब Xiaomi की नंबर सीरीज में 15 जुड़ने जा रहा है। उम्मीद है कि ब्रांड पिछले साल की…
टेक कंपनी Google मई में अपना सालाना इवेंट आयोजित करने जा रही है। इसके एक नए मोबाइल Google…

हॉनर X9b ऑनर ब्रांड धीरे-धीरे भारतीय बाजार में अपनी जगह बना रहा है और अपने उत्पाद पोर्टफोलियो का…

Samsung ने पिछले महीने अपनी A-सीरीज़ का स्मार्टफोन Galaxy A35 लॉन्च किया था। वहीं, अब M-सीरीज प्रोडक्ट पोर्टफोलियो में Samsung Galaxy M35…
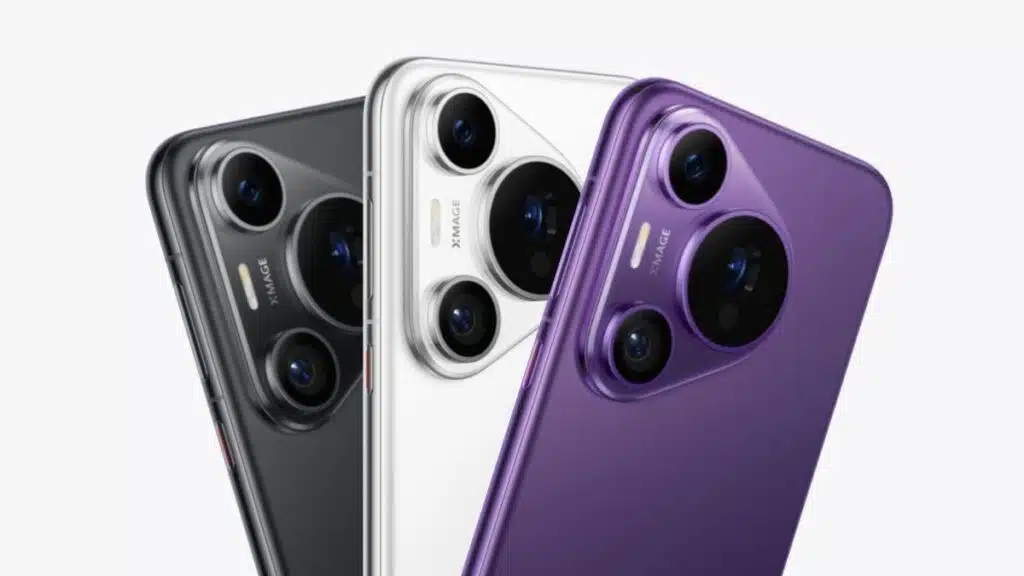
Huawei ने अपनी नई Pura 70 सीरीज को घरेलू बाजार चीन में लॉन्च कर दिया है। इसके तहत चार मॉडल लॉन्च किये…
वीवो भारत में अपनी ‘V30’ सीरीज का विस्तार करने की तैयारी कर रहा है। इसके तहत विवो V30 और वीवो V30 प्रो…

देश के हर गांव और शहर में पेटीएम यूजर्स हैं। सरकार द्वारा कुछ पेटीएम सेवाओं को बंद करने के बाद भुगतान और…
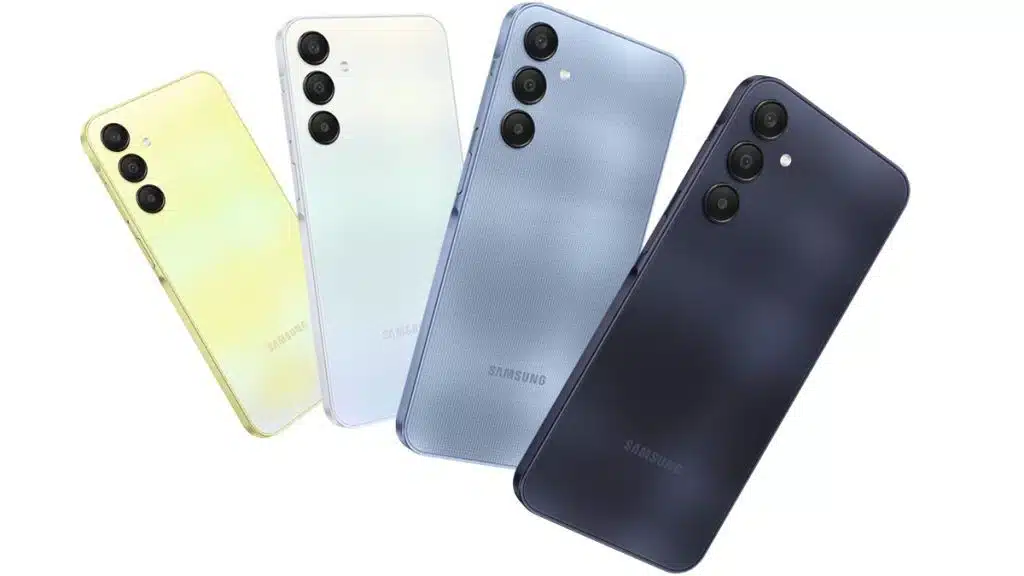
Samsung ने पिछले साल दिसंबर में अपनी A-सीरीज़ में Samsung Galaxy A25 5G पेश किया था। वहीं, ऑफलाइन…

वनप्लस ने पिछले साल भारत में अपना पहला टैबलेट वनप्लस पैड पेश किया था। वहीं, अब कंपनी इसके…

Tecno ने फरवरी में मोबाइल वर्ल्ड कांग्रेस 2024 के दौरान अपना Tecno Camon 30 Premier 5G फोन शोकेस किया था। वहीं, अब…
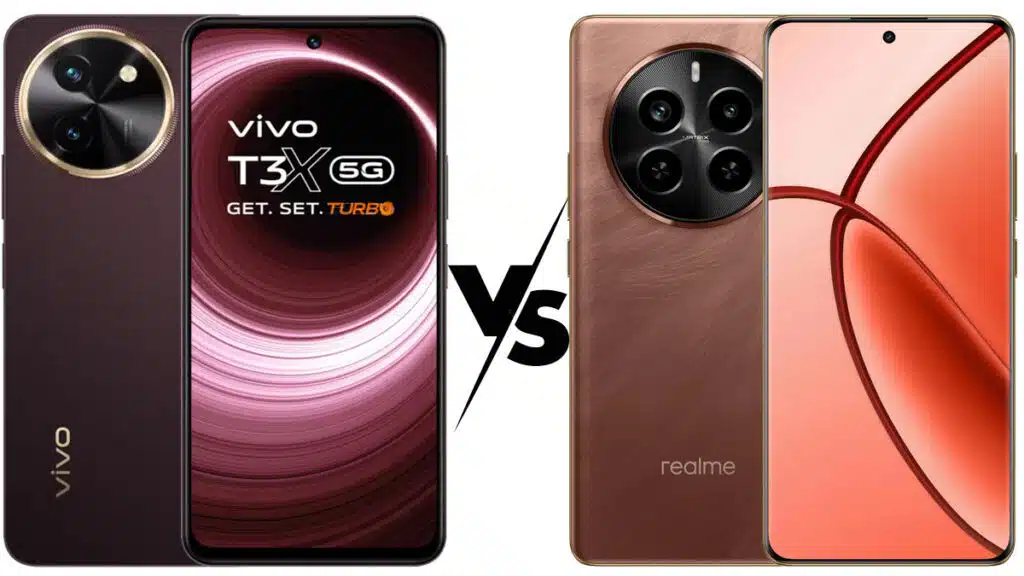
भारतीय मोबाइल बाजार में इस हफ्ते कई कम बजट और मिडरेंज फोन लॉन्च हुए हैं। रियलमी पी1 प्रो 5जी और वीवो टी3एक्स…
रियलमी 12x Realme इस महीने की शुरुआत में रियलमी C65 4G स्मार्टफोन को वियतनाम में लॉन्च किया गया था मीडियाटेक हेलियो G85…

जिस देश और दुनिया में टेक्नोलॉजी लोगों को आगे बढ़ा रही है. साथ ही यह लोगों को विमुख…
Xiaomi सब-ब्रांड Redmi ने नवंबर 2023 में चीन में अपनी ‘K70’ सीरीज़ लॉन्च की। इसमें तीन दमदार स्मार्टफोन…

व्हाट्सएप चैट फिल्टर फीचर अब सभी यूजर्स के लिए चरण दर चरण जारी किया जा रहा है। आने…
कम बजट में दमदार 5G स्मार्टफोन खरीदने की चाहत रखने वाले यूजर्स के लिए Vivo एक नया तोहफा लेकर आया है। ब्रांड…

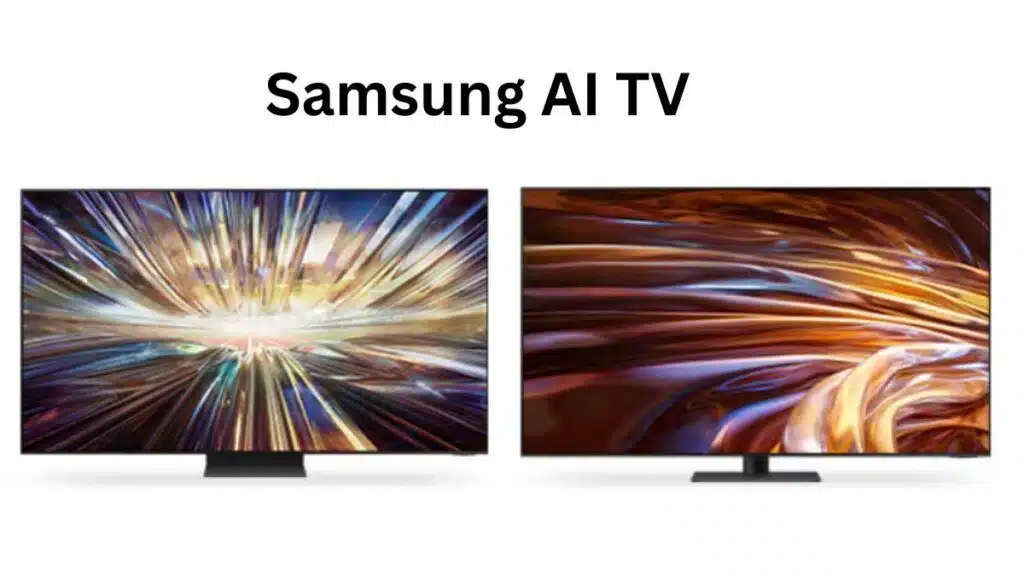
सैमसंग ने भारतीय बाजार में AI तकनीक के साथ नए Neo QLED 8K, Neo QLED 4K और OLED…

हाल ही में आई एक रिपोर्ट में HMD की आने वाली डिवाइसेज की लिस्ट सामने आई थी। इनमें से एक था HMD…
मुझे पढ़ो हाल ही में भारत में अपनी नई ‘पी’ सीरीज लॉन्च की है। रियलमी पी1 5जी और…
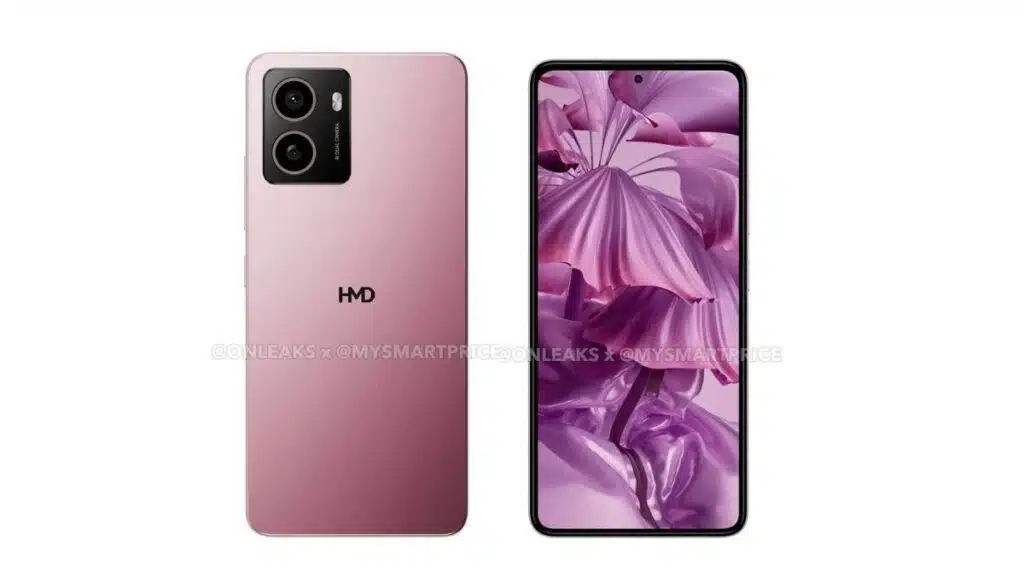
पिछले कुछ महीनों से बाजार में चर्चा है कि HMD जल्द ही अपने नए पल्स सीरीज के स्मार्टफोन…

नार्ज़ो 70 प्रो Realme ने घोषणा की है कि वह भारत में अपनी ‘Narzo’ सीरीज़ के तहत एक…

ओप्पो A79 5G टेक ब्रांड ओप्पो अपनी ‘ए’ सीरीज में एक नया स्मार्टफोन लॉन्च करने की तैयारी कर…

क्या आप जानते हैं कि एयरटेल यूजर्स डिज्नी+हॉटस्टार ओटीटी प्लेटफॉर्म का इस्तेमाल बिल्कुल मुफ्त कर सकते हैं। हां, अगर आप भी बिना…
ओप्पो अपनी K-सीरीज़ के तहत एक नया मोबाइल ओप्पो K12 लॉन्च कर सकता है। कहा जा रहा है…

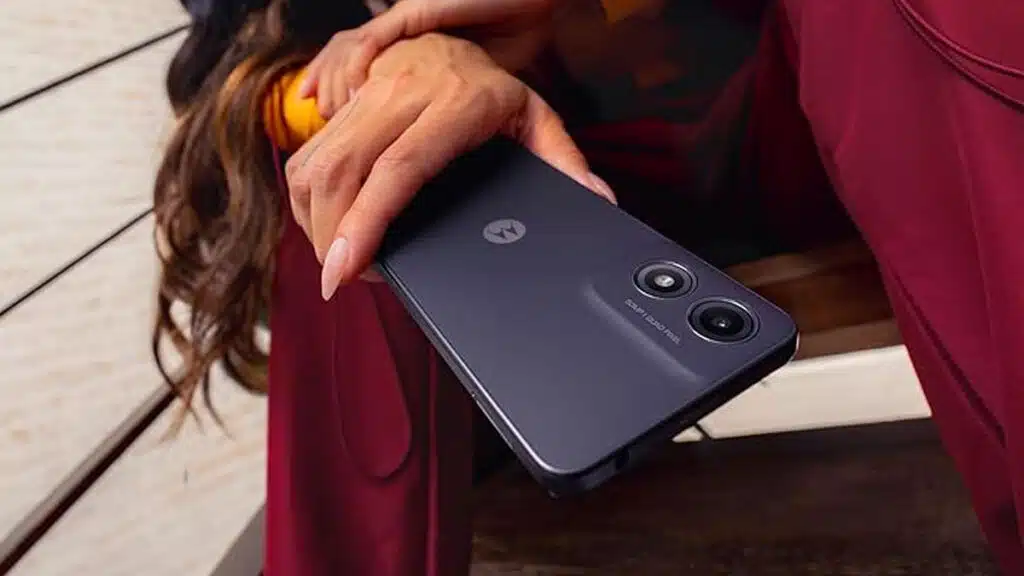
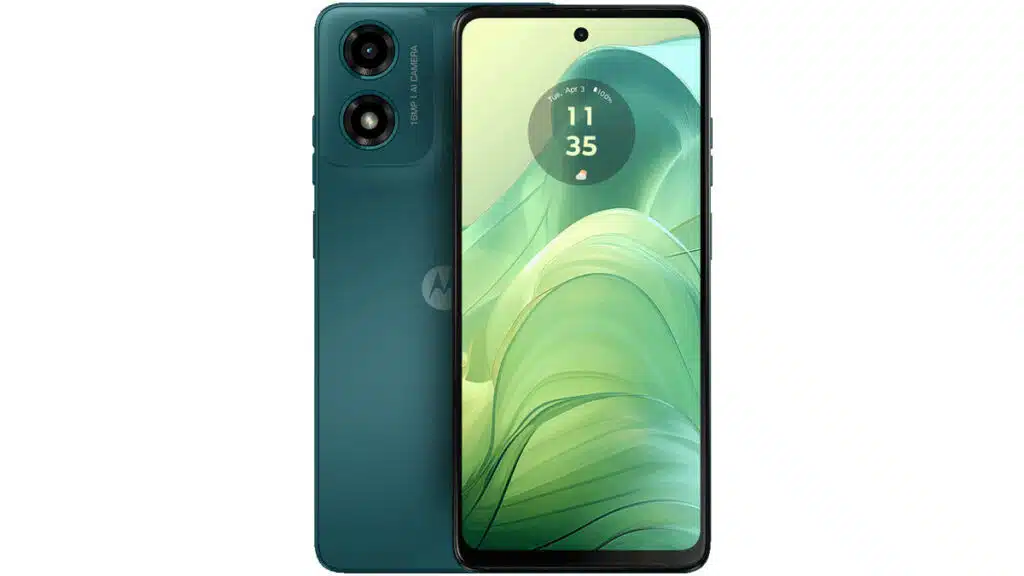
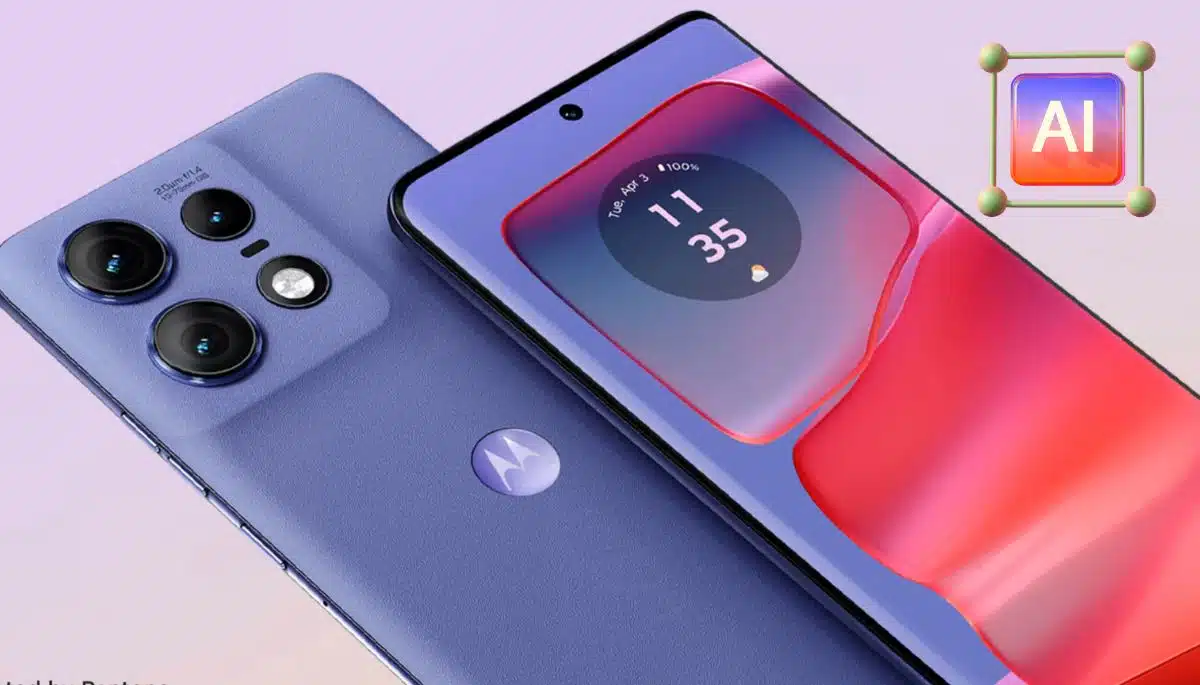
MOTOROLA आज, इसने नए स्मार्टफोन के साथ भारतीय मोबाइल बाजार में अपने उत्पाद पोर्टफोलियो का विस्तार किया है। मोटो G64 5G लॉन्च…

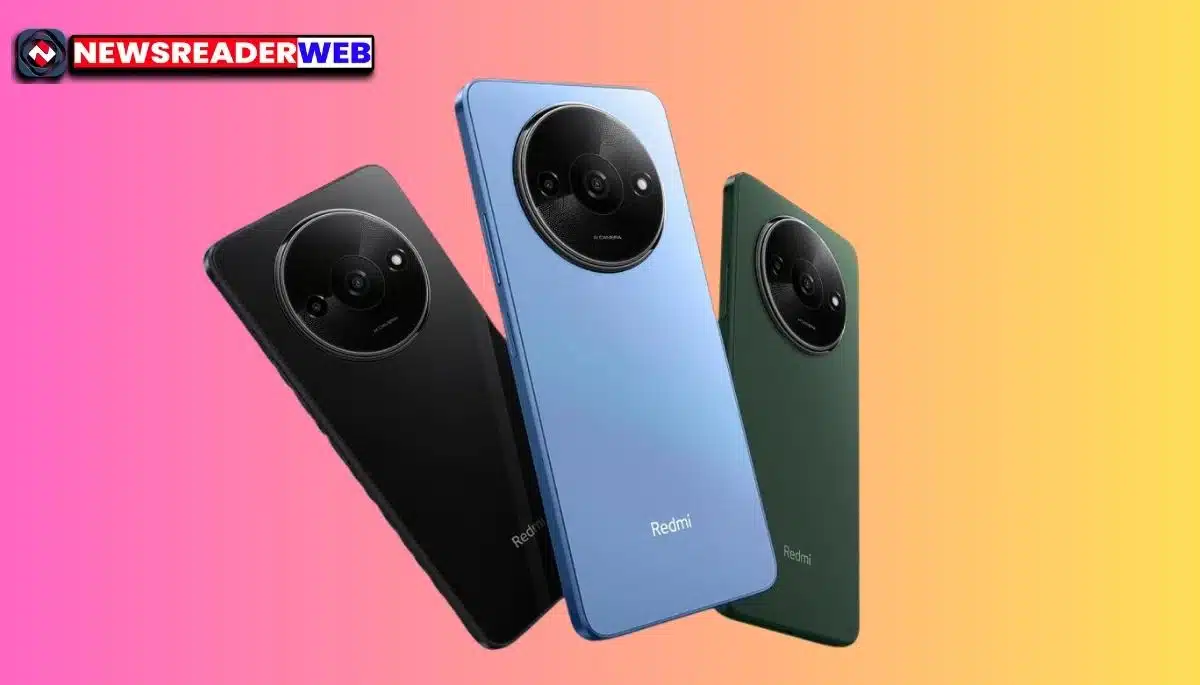
नया टैबलेट खरीदने की चाहत रखने वाले भारतीय यूजर्स के लिए Redmi एक नया तोहफा लेकर आ रहा…

Motorola ने 3 अप्रैल को भारतीय बाजार में अपना नया Edge सीरीज का स्मार्टफोन Edge 50 Pro 5G…
Google अपने Pixel फोल्ड मोबाइल पोर्टफोलियो का नाम बदल सकता है। आपको बता दें कि कंपनी ने पिछले…

तारविहीन चार्जर आजकल बहुत लोकप्रिय हो रहा है. कई मोबाइल फोन वायरलेस चार्जिंग तकनीक से लैस हैं और ऐसे स्मार्टफोन के साथ…
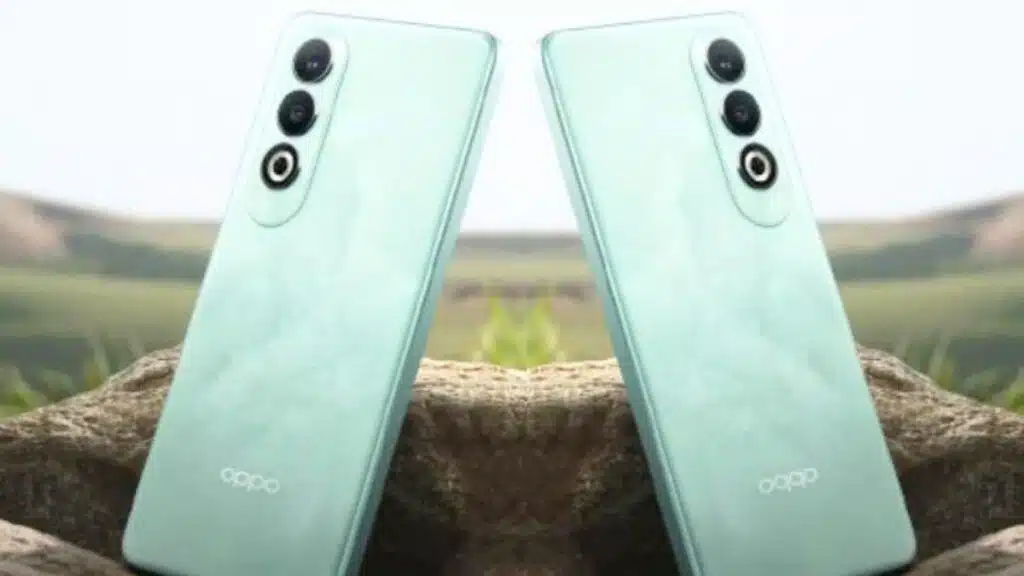
ओप्पो ने अपने घरेलू बाजार चीन में दो नए स्मार्टफोन लॉन्च करके अपनी ‘ए’ सीरीज़ का विस्तार किया…

Vivo T3x 5G फोन भारत में 17 अप्रैल को लॉन्च होगा।यह फोन भारतीय बाजार में लॉन्च होने से महज एक दिन दूर…
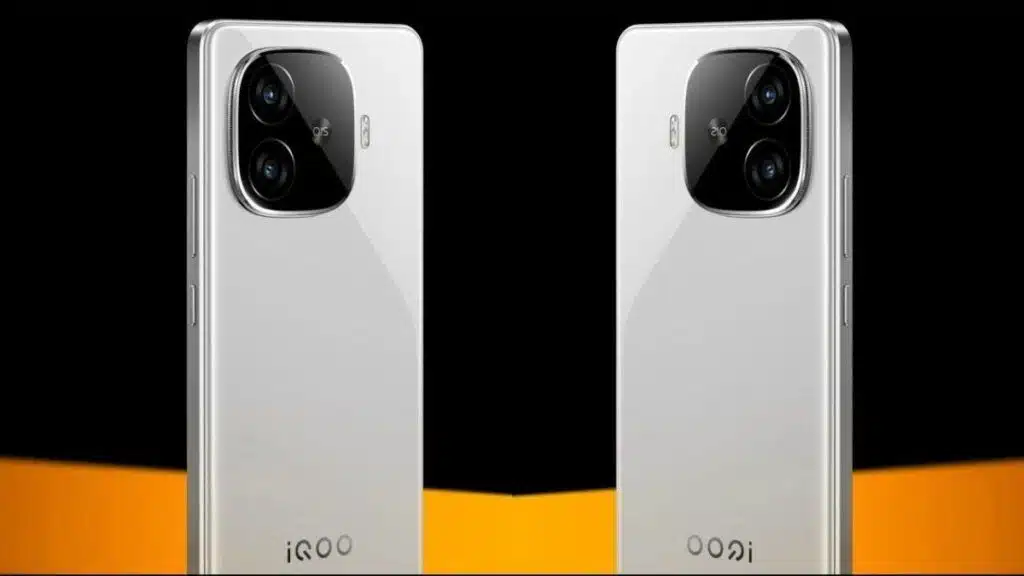
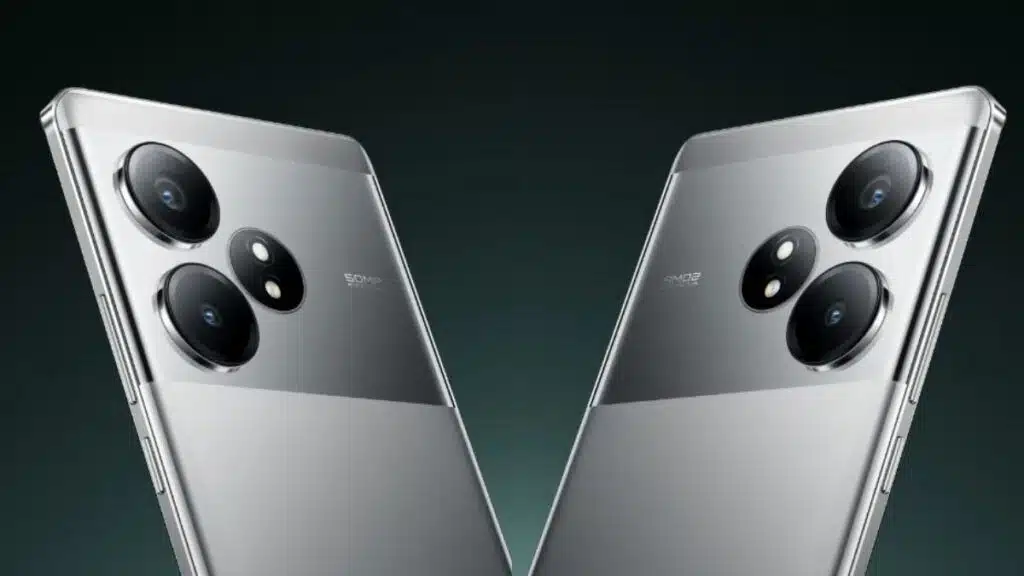
मोबाइल ब्रांड iQoo की Z9 सीरीज़ 24 अप्रैल को चीन में लॉन्च होने वाली है। इसके तहत तीन फोन iQOO Z9, iQOO…
Vivo की V30 सीरीज भारत और ग्लोबल मार्केट में पहले ही लॉन्च हो चुकी है। इसके तहत V30…

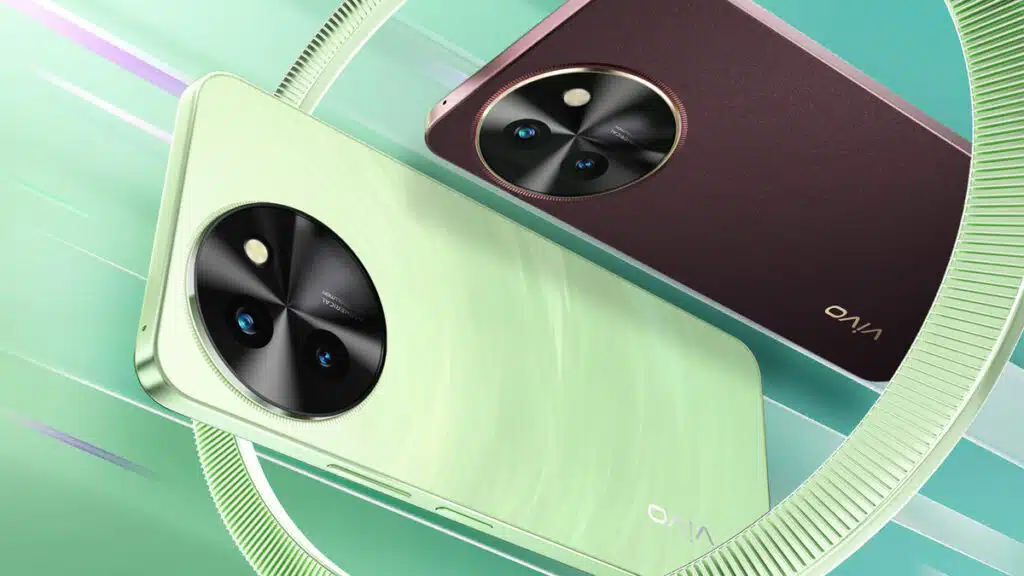
Vivo Y-सीरीज का नया स्मार्टफोन Vivo Y200i लॉन्च करने की तैयारी में है। फिलहाल फोन के बारे में…

वोडाफोन आइडिया महीने दर महीने अपने ग्राहक खोती जा रही है। साथ ही कंपनी पर करोड़ों का कर्ज भी है. लेकिन, इन…
पोको अगले कुछ हफ्तों में अपनी F6 सीरीज लॉन्च कर सकती है। इसके तहत POCO F6 और POCO F6 Pro जैसे दो…

Realme ने आज से भारत में एक नई स्मार्टफोन सीरीज लॉन्च कर दी हैरियलमी पी सीरीज़‘ शुरू हो गया है। इसके तहत…

गुजरात गैस लिमिटेड (जीजीएल) यह देश की सबसे बड़ी शहरी गैस वितरण कंपनियों में से एक है। कंपनी 6 राज्यों के 44…

Tecno अब तक भारतीय बाजार में दो फोल्डेबल स्मार्टफोन पेश कर चुकी है। जिसमें फोल्ड और फ्लिप शामिल है। वहीं, अब खबर…

विवो S18 वीवो ने पिछले साल के अंत में चीन में अपनी ‘S18’ सीरीज़ लॉन्च की थी। इस सीरीज के तहत तीन…
भारत में कई 5जी फोन लॉन्च हो रहे हैं। 5G स्मार्टफोन हर बजट में आ रहे हैं और भारतीय मोबाइल यूजर्स इनका…
फोटो क्रेडिट: द क्विंट भारत की सबसे बड़ी टेलीकॉम कंपनी रिलायंस जियो के ग्राहकों के पास विभिन्न मूल्य रेंज में रिचार्ज प्लान…

ओप्पो ने पिछले हफ्ते ही अपनी ‘ए’ सीरीज लॉन्च की थी। ओप्पो A3 प्रो पेश कर दिया गया है जिसे चीन में…

गर्मियों में सबसे बड़ा डर घर में रखे फल और सब्जियों के खराब होने का होता है। लेकिन, अब आपको इसके बारे…

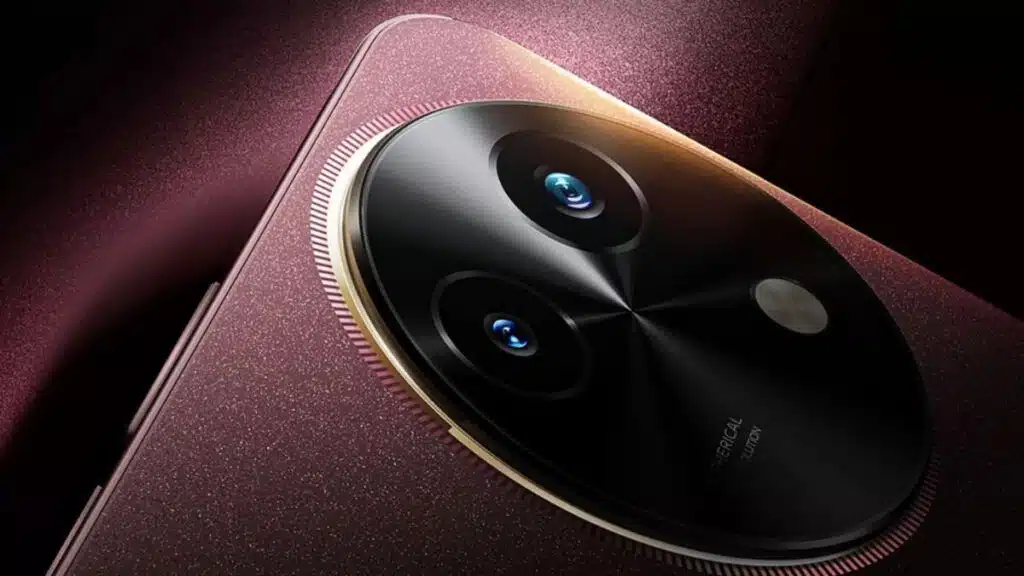
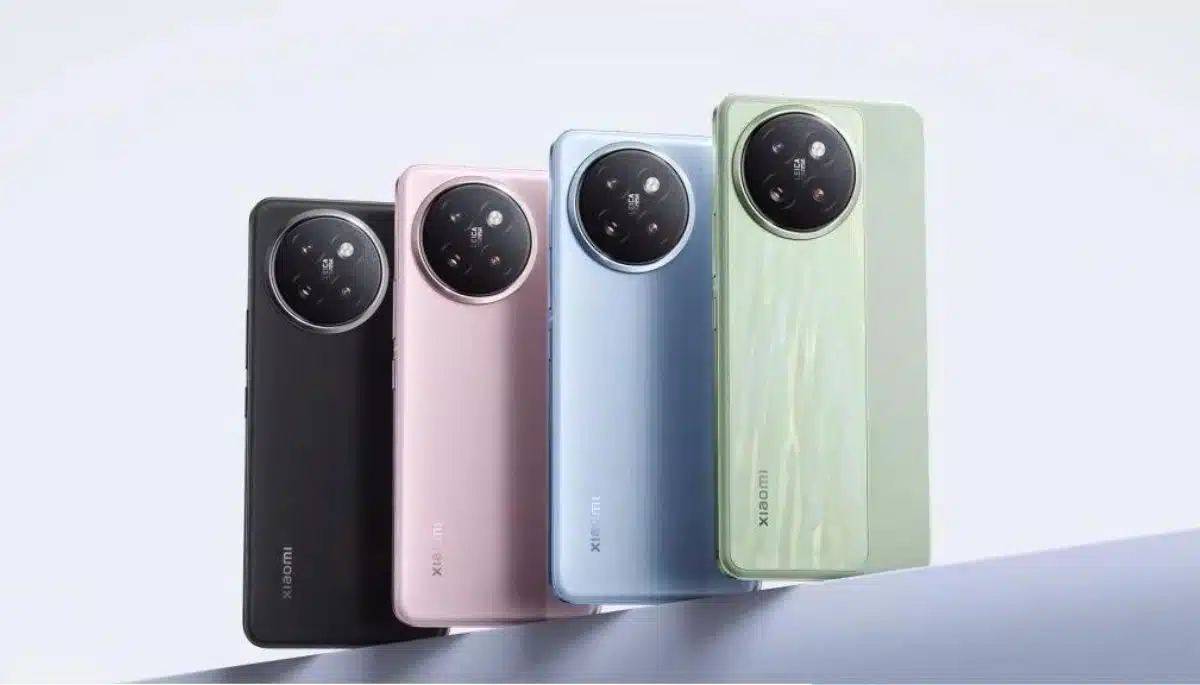
लोग हैं, जो कैमरा फोन यदि आप रुचि रखते हैं, तो आपने लेईका का नाम सुना होगा। इस ब्रांड का कैमरा लेंस…

टेलीकॉम कंपनियां ग्राहकों को आकर्षित करने के लिए तरह-तरह के ऑफर दे रही हैं। ऐसे में कंपनियां अपने यूजर्स की जरूरतों को…
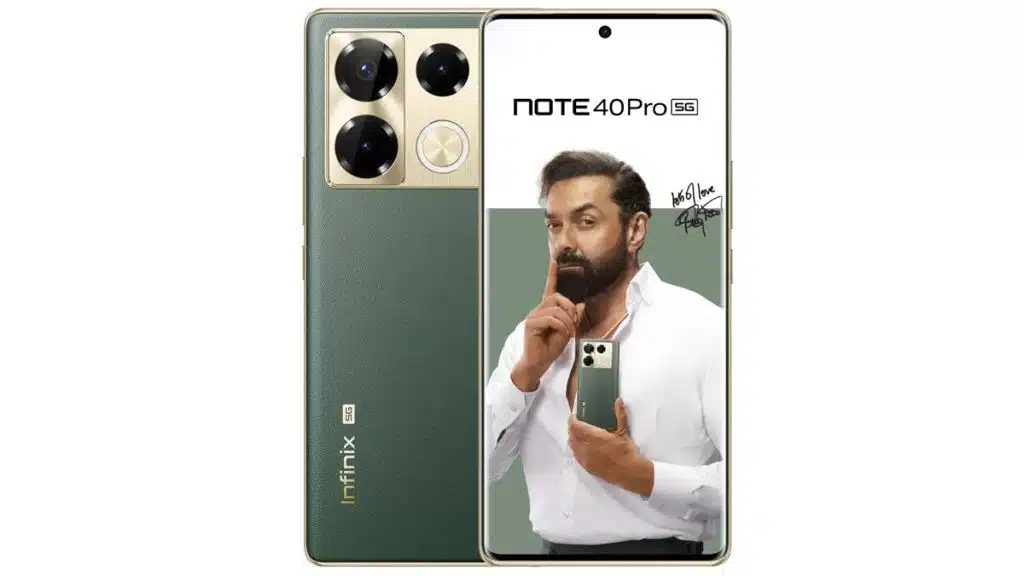
Infinix ने आज भारत में अपनी नई Note सीरीज लॉन्च की। कंपनी की ओर से इनफिनिक्स नोट 40 प्रो 5जी और इनफिनिक्स…

Vivo आने वाले समय में अपनी V30 सीरीज का विस्तार कर सकता है। इसके तहत अब तक Vivo…

IQ ने दिसंबर 2023 में अपने घरेलू बाजार चीन में अपनी Neo 9 सीरीज़ पेश की, जिसके तहत…

Realme अपनी पहली P-सीरीज़ लॉन्च करने के लिए पूरी तरह तैयार है। ब्रांड ने घोषणा की है कि रियलमी पी1 5जी और…

Realme ने मार्च महीने में अपनी Narzo सीरीज का नया स्मार्टफोन Realme Narzo 70 Pro 5G लॉन्च किया…

विरोध आज उसने अपनी ‘ए’ सीरीज के तहत एक नया स्मार्टफोन लॉन्च किया है। ओप्पो A3 प्रो लॉन्च किया गया है. इस…

प्रधानमंत्री मुद्रा योजना (पीएमएमवाई) इसे मोदी सरकार ने स्वरोजगार को बढ़ावा देने के लिए 2015 में लॉन्च किया था। इस योजना के…

SAMSUNG इसने अपने फैंस के लिए एक शानदार स्कीम पेश की है. कंपनी की ओर से Galaxy F34 5G फोन पर 5,000…
MOTOROLA हाल ही में अपना नया ‘G’ सीरीज स्मार्टफोन लॉन्च किया है। बड़े G04s टेक को मंच पर पेश किया गया। कंपनी…
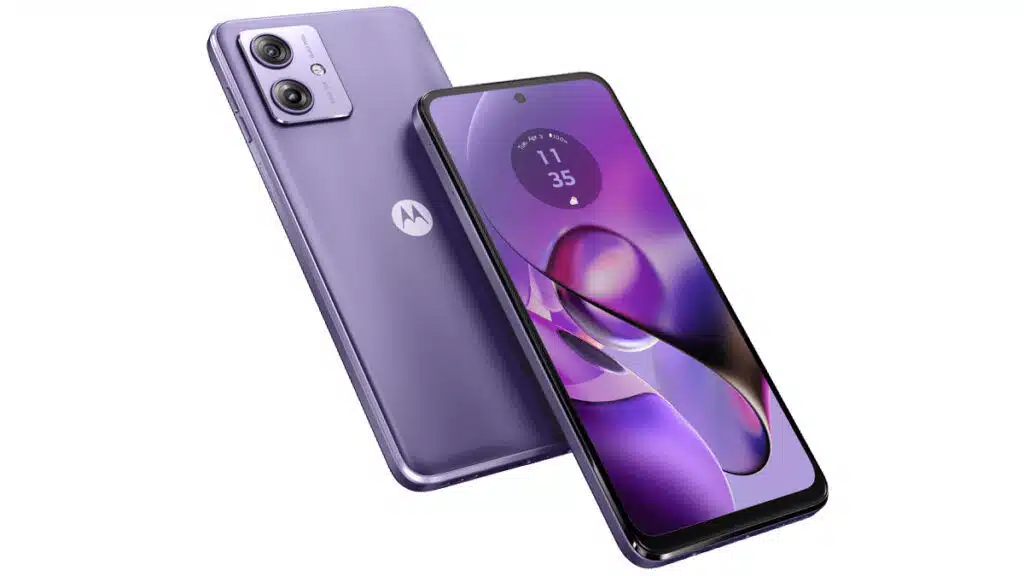
Moto G64 5G फोन भारत में लॉन्च के लिए पूरी तरह तैयार है। मोटोरोला का यह नया 5G फोन अगले हफ्ते भारतीय…
अगर आप सोच रहे हैं कि नोकिया फोन अब लॉन्च नहीं होंगे तो कंपनी हैरान है। दरअसल, HMD…

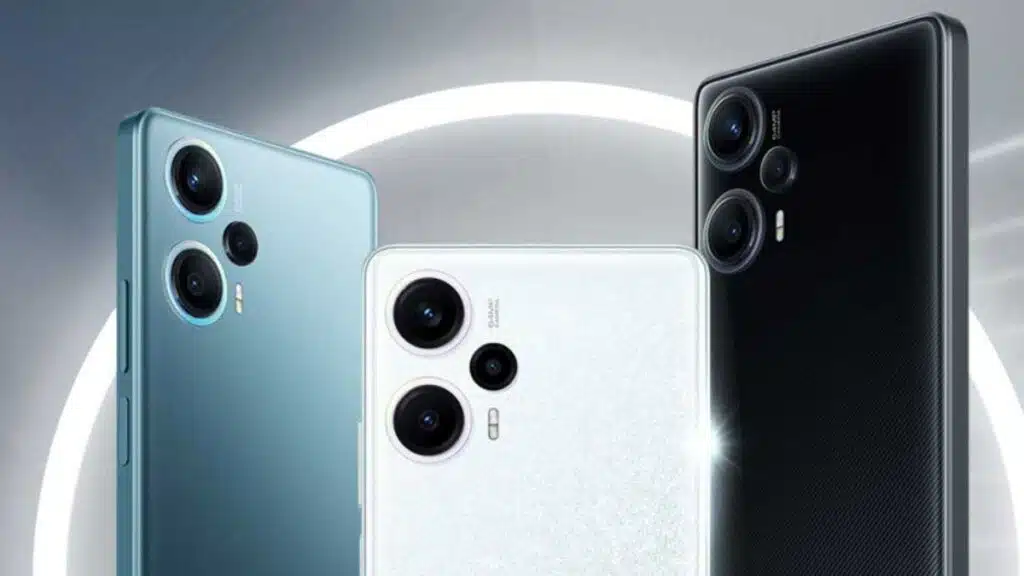
रेनॉल्ट 11 ओप्पो रेनो 11 और रेनॉल्ट 11 प्रो जनवरी 2024 में भारत में लॉन्च किया गया, कीमत…
सर्वश्रेष्ठ एंड्रॉइड स्मार्टफोन जब खरीदारी का सवाल उठता है तो कई लोग वनप्लस आत्मविश्वास व्यक्त करें. मिड बजट फोन खरीदने वाले ज्यादातर…

भारत की सबसे बड़ी टेलीकॉम कंपनियों में से एक भारती एयरटेल अपने यूजर्स को आपातकालीन वैधता ऋण सुविधा प्रदान करती है। एक…

SAMSUNG 4 मार्च 2024 को भारतीय बाजार में अपना सबसे सस्ता 5G फोन लॉन्च किया गैलेक्सी F15 5G शुरू किया गया था।…

Realme GT Neo 6 SE लॉन्च हो गया हैइस मोबाइल को कंपनी ने चीनी बाजार में पेश किया है। 16 जीबी रैम…
iQOO जल्द ही चीन में iQOO Neo 9S Pro लॉन्च करने की तैयारी कर रहा है। वहीं, फोन…

देश की तीसरी सबसे बड़ी टेलीकॉम कंपनी लंबे समय से खोए हुए अपने ग्राहकों को वापस पाने की कोशिश कर रही है।…
Vivo ने कुछ दिन पहले कहा था कि वह भारत में अपना नया 5G फोन लॉन्च करने जा रही है जिसे ‘T’…

मोटोरोला ने 3 अप्रैल को भारतीय बाजार में Motorola Edge 50 Pro 5G स्मार्टफोन लॉन्च किया है। यह…

OPPO A3 Pro को 12 अप्रैल को चीन में लॉन्च किया जाएगाकंपनी लगातार इस फोन को इंटरनेट पर…
Xiaomi के सब-ब्रांड Redmi ने अपनी नई Turbo सीरीज का पहला फोन चीन के होम मार्केट में लॉन्च…

अब तक वीवो की X100 सीरीज के दो मोबाइल भारत और ग्लोबल मार्केट में लॉन्च हो चुके हैं।…

सस्ता सैमसंग स्मार्टफोन अगर आप खरीदना चाहते हैं तो यह बाजार में उपलब्ध है। गैलेक्सी A05 आपके लिए उपयोगी हो सकता है….

Motorola ने हाल ही में अपना प्रीमियम स्मार्टफोन Edge50 Pro बाजार में लॉन्च किया है। वहीं, अब G…

उत्तर प्रदेश सरकार निराश्रित महिलाओं के लिए पेंशन योजना (विधवा पेंशन) गाड़ी चला रहा है। निराश्रित महिला पेंशन या विधवा पेंशन योजना…
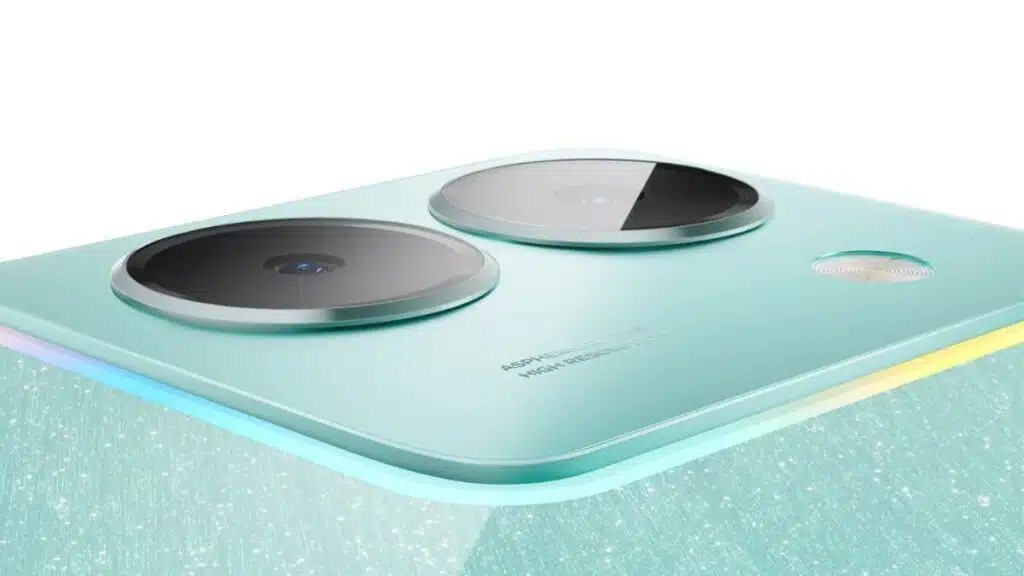
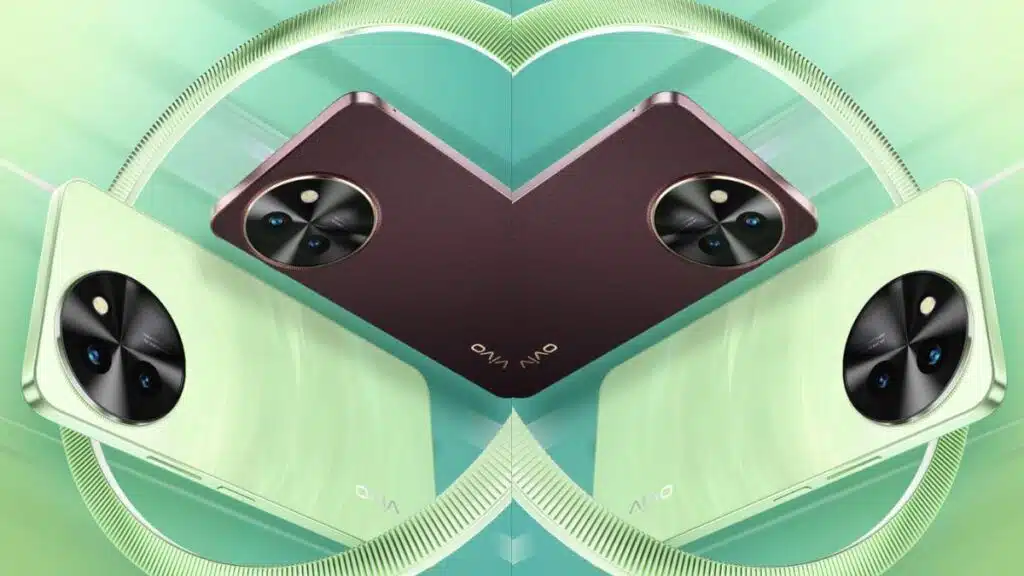
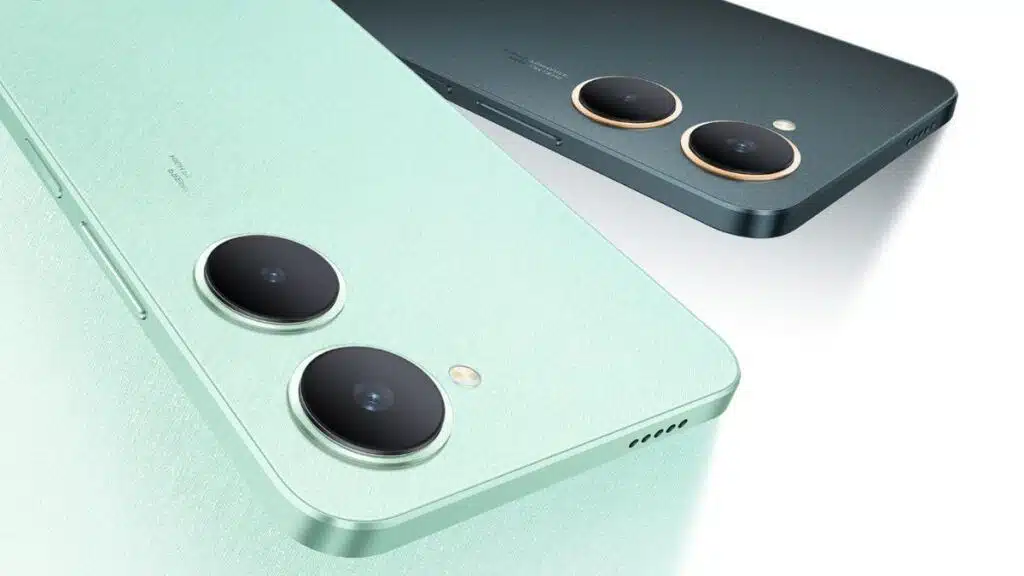
Vivo अपनी Y-सीरीज़ में एक नया स्मार्टफोन जोड़ सकता है जो Vivo Y38 5G नाम के साथ बाजार…
दिग्गज टेक कंपनी Google अगले महीने अपनी Pixel 8 सीरीज का नया स्मार्टफोन Google Pixel 8a पेश करेगी।…

Xiaomi सब-ब्रांड Redmi दिसंबर 2023 में अपना कम बजट वाला 5G फोन लॉन्च करेगा रेडमी 13सी 5जी भारत में लॉन्च किया गया…

भारतीय स्मार्टफोन बाजार के लिए अप्रैल का पहला हफ्ता बेहद खास रहा है। पहले 7 दिनों में भारत में वनप्लस नॉर्ड CE4…

अगर आप भी इस चिलचिलाती गर्मी से परेशान हैं और घर पर कूलर लाने की सोच रहे हैं…
iQOO Z9 5G फोन भारतीय बाजार में 19,999 रुपये की कीमत पर बिक्री के लिए उपलब्ध है।मीडियाटेक डाइमेंशन 7200 प्रोसेसर द्वारा संचालित…
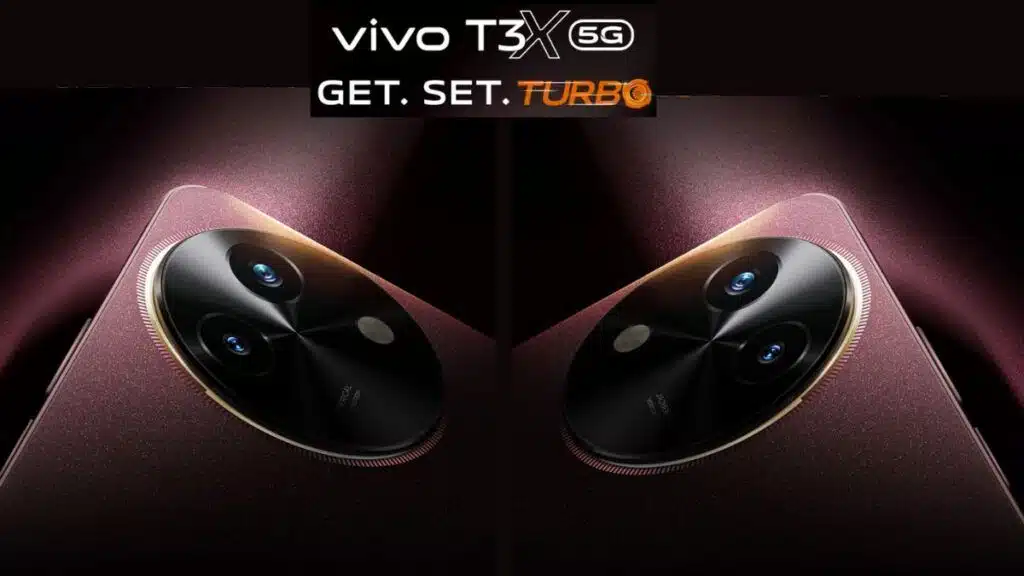
Vivo ने कल अपने Vivo T3x 5G स्मार्टफोन के भारतीय लॉन्च की पुष्टि की। फ्लिपकार्ट टीज़र में फोन…
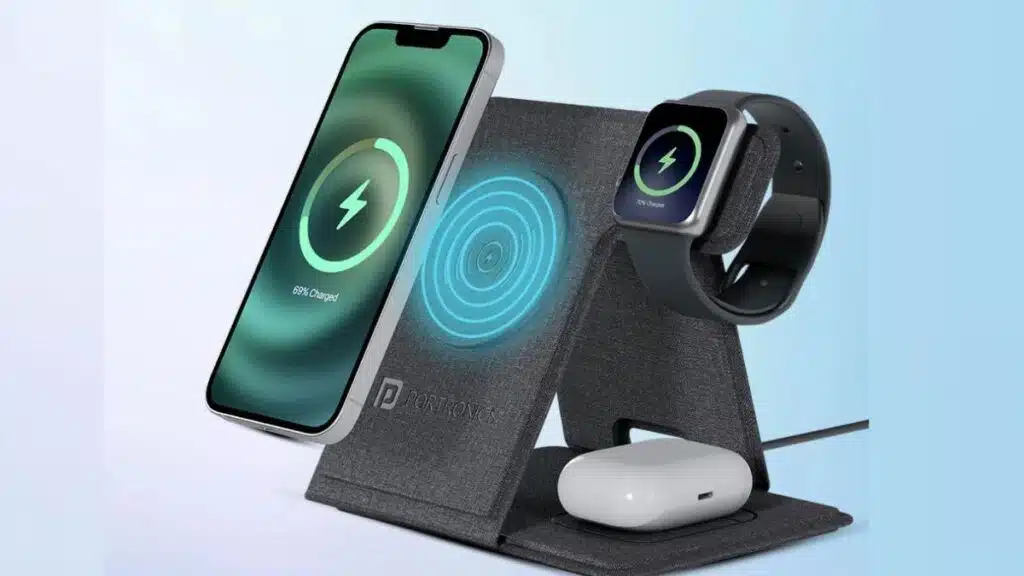
टेक ब्रांड पोर्ट्रोनिक्स ने भारत में फ्रीडम फोल्ड 3 नाम से एक नया 3 इन 1 फोल्डेबल चार्जर…
मोटोरोला ने एक नया कम बजट वाला मोबाइल फोन लॉन्च किया है बड़े G04s टेक प्लेटफार्म पर प्रस्तुत किया गया। यह स्मार्टफोन…
Redmi ने इसे इस साल की शुरुआत में अपनी नोट सीरीज़ के तहत लॉन्च किया था। रेडमी नोट 13 प्रो+ 5जी फोन…

Realme की नई पेशकश P-सीरीज़ भारत में 15 अप्रैल को लॉन्च होने जा रही है। ब्रांड ने कल लॉन्च की तारीख की…
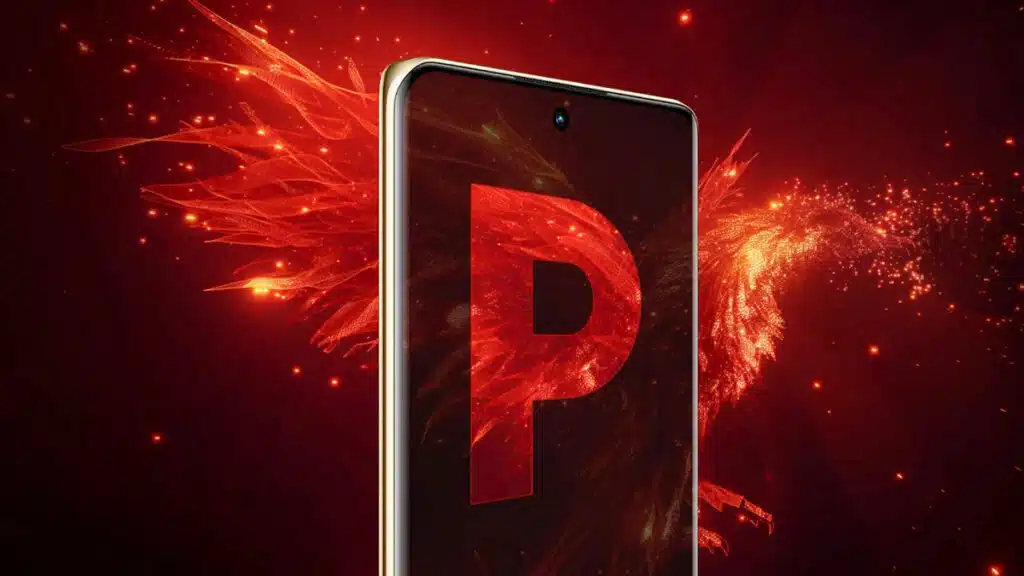
मुझे पढ़ो आज घोषणा की गई है कि कंपनी एक नई स्मार्टफोन सीरीज ला रही है रियलमी पी…

ओकिटेल WP20 प्रो मजबूत फ़ोन मशहूर टेक ब्रांड Oukitel जल्द ही एक नया स्मार्टफोन ला रहा है जिसे Oukitel WP35 नाम से…

Realme ने हाल ही में ग्लोबल मार्केट में Realme C65 स्मार्टफोन लॉन्च किया है। वहीं, अब भारतीय बाजार में C सीरीज के…

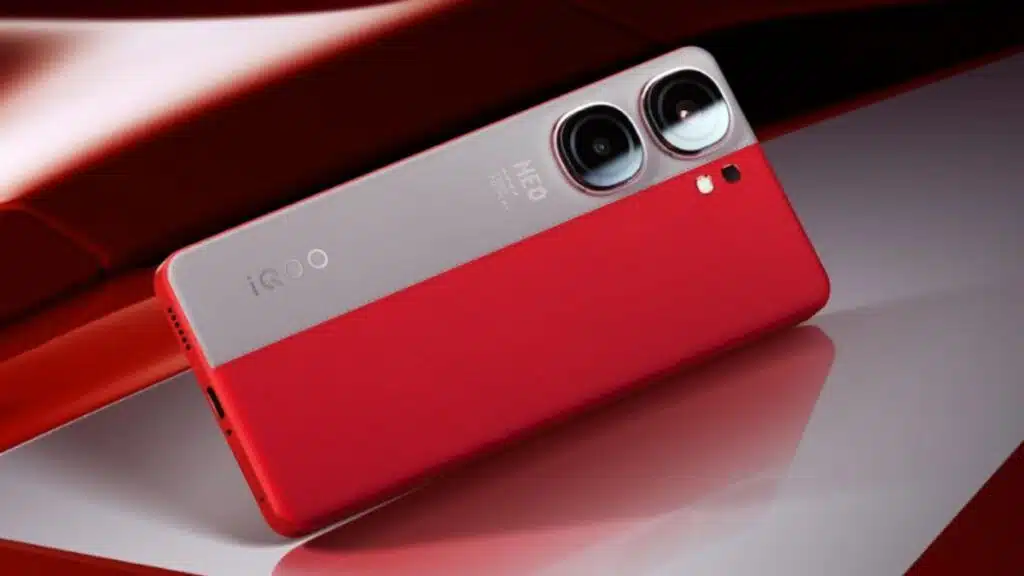
iQOO जल्द ही अपने नए फोन के साथ मोबाइल बाजार में धूम मचाने के लिए तैयार दिख रहा…
Vivo की T3 सीरीज का नया स्मार्टफोन Vivo T3x 5G लॉन्च के लिए पूरी तरह तैयार है। ब्रांड…
Samsung ने 8 अप्रैल को M-सीरीज़ के तहत Galaxy M55 और Galaxy M15 5G को भारत में लॉन्च…
आजकल भारत और दुनिया में आर्टिफिशियल इंटेलिजेंस यानी AI की खूब चर्चा हो रही है। इस तकनीक का…

भारती एयरटेल और रिलायंस जियो टक्कर देने वाली भारत की तीसरी सबसे बड़ी टेलीकॉम कंपनी वोडाफोन आइडिया (Vi) काफी समय से प्रयास…

Realme अब तक भारतीय यूजर्स के लिए कई बेहतरीन बजट स्मार्टफोन ला चुका है। वहीं, अब ब्रांड ने…
Xiaomi का सब-ब्रांड Redmi कुछ दिन पहले उसने घोषणा की थी कि वह ”नाम से अपनी नई स्मार्टफोन…
सैमसंग गैलेक्सी ‘एम’ सीरीज भारत में आज नए मोबाइल फोन लॉन्च हो गए हैं। कंपनी के पास है सैमसंग गैलेक्सी M15 5G…
IQ भारत में अपनी Z9 सीरीज का इकलौता फोन iQOO Z9 लेकर आया है। उम्मीद है कि ब्रांड…

मोटोरोला एज 50 प्रो मोटोरोला एज 50 प्रो 5जी फोन भारत में लॉन्च हो चुका है और 31,999…
Realme ने अपने नए फ्लैगशिप स्मार्टफोन की लॉन्च डेट तय कर ली है। इसे होम मार्केट चीन में 11 अप्रैल को Realme…

वीवो V30 प्रो Vivo V30 सीरीज को कुछ दिन पहले ही भारत में लॉन्च किया गया है विवो…

Infinix की Note 40 Pro सीरीज 12 अप्रैल को भारतीय बाजार में लॉन्च होने वाली है। इसके तहत…
Google की Pixel सीरीज का नया स्मार्टफोन Google Pixel 8a आने वाले महीनों में लॉन्च हो सकता है।…

जब भी हम कोई नया सिम कार्ड लेते हैं तो हमें नया नंबर याद रखने में थोड़ा समय लगता है। ऐसे में…

पिछले साल, सैमसंग ने भारत में अपनी ‘ए’ सीरीज़ के दो टैबलेट गैलेक्सी टैब ए9 और टैब ए9+…

वीवो की V30 सीरीज भारत समेत अन्य बाजारों में लॉन्च हो चुकी है। इसके तहत Vivo V30 और…

Google जल्द ही कुछ बाज़ारों में Google Pixel 8a लॉन्च करने की तैयारी कर रहा है। फोन को…

मोटोरोला ने हाल ही में एज 50 प्रो को भारतीय बाजार में लॉन्च किया है। वहीं, Edge 50 सीरीज का दूसरा स्मार्टफोन…
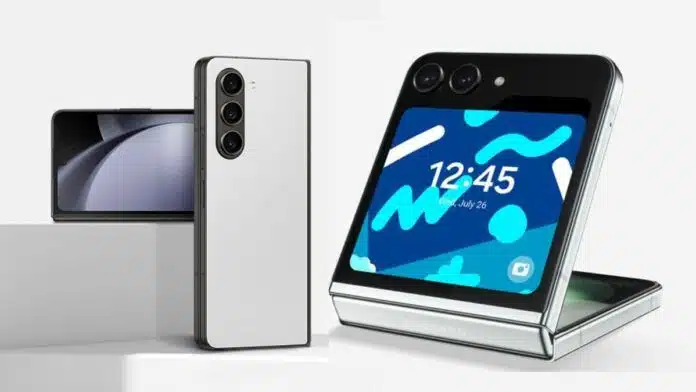
सैमसंग के फोल्ड और फ्लिप मोबाइल पोर्टफोलियो में दो (FE) फैन एडिशन जुड़ने की खबर चर्चा में है।…
रेडमी ने कहा है कि वह अपनी नई ‘टर्बो’ सीरीज पेश करने की तैयारी में जुटी है और…

बहुत से लोग iPhone इस्तेमाल करना चाहते हैं लेकिन महंगी कीमत के कारण। एप्पल मोबाइल खरीद नहीं सकते…

क्या आप अपना Jio मोबाइल नंबर भूल गए हैं? खासकर जो लोग नया सिम खरीदते हैं या उसे सेकेंडरी सिम के तौर…

Vivo आने वाले हफ्तों में भारत में Vivo T3x स्मार्टफोन लॉन्च कर सकता है। इस पर एक खास…

सैमसंग’फ़े‘ मतलब प्रशंसक संस्करण एक स्मार्टफोन सेगमेंट है जिसमें कंपनी के पास फ्लैगशिप हैं गैलेक्सी एस सीरीज कम लागत प्रदान करता है….
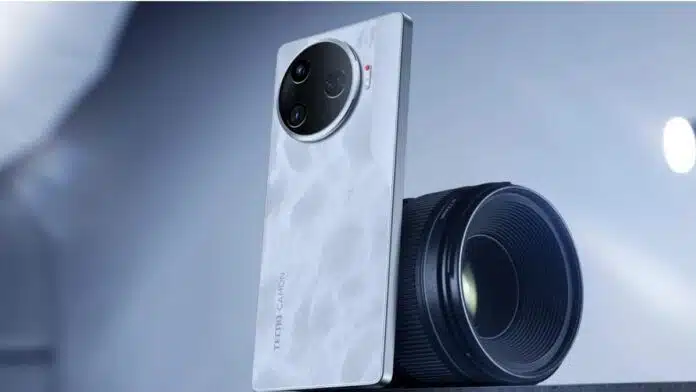
टेक्नो ने फरवरी में MWC में पोलारिस इमेजिंग सिस्टम और 1.5K LTPO स्क्रीन के साथ CAMON 30 का…
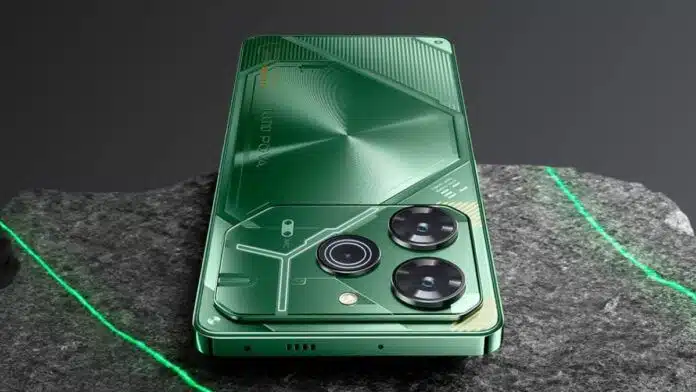
टेक्नो पोवा 6 प्रो 5जी रुपये। 19,999 की कीमत पर भारत में बिक्री के लिए उपलब्ध है। भारत में इस पोवा फोन…

Tecno Pova 6 Pro 5G आज से भारत में बिक्री के लिए उपलब्ध हो गया, जबकि ब्रांड ने अब श्रृंखला का नियमित…
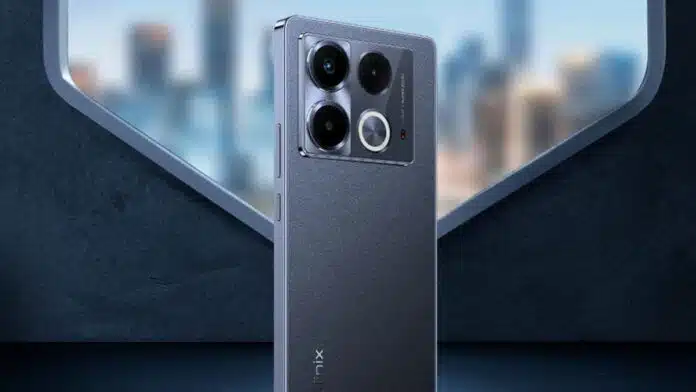
Infinix 12 अप्रैल को भारतीय बाजार में अपनी Note 40 Pro सीरीज लॉन्च करने जा रही है। वहीं,…

Samsung Galaxy M15 5G फोन की भारतीय बाजार में घोषणा कर दी गई है जो 8 अप्रैल को रिलीज होगा। इस दिन…
रिलायंस जियो ने पिछले साल Jioभारत 4G फीचर फोन लॉन्च किया था, जिसकी कीमत महज 999 रुपये थी। वहीं, अब कंपनी ने…

ऑनर ने अपनी X7B सीरीज में एक नया 5G स्मार्टफोन जोड़ा है। ब्रांड ने इस डिवाइस को ग्लोबल मार्केट में Honor X7b…
Realme ने हाल ही में ग्लोबल मार्केट में अपना C65 स्मार्टफोन लॉन्च किया है। वहीं अब C सीरीज…
Tecno ने 29 मार्च को भारत में अपना अनोखा मोबाइल Tecno Pova 6 Pro 5G लॉन्च किया। वहीं, ब्रांड ने आज से…

POCO X6 नियो 91 मोबाइल हाल ही में अपनी एक्सक्लूसिव खबर में कहा था कि टेक ब्रांड पोको भारत में और इसके…
Vivo निकट भविष्य में अपनी Y-200 सीरीज का नया स्मार्टफोन बाजार में लॉन्च कर सकता है। इस मोबाइल…

छवि क्रेडिट: बिजनेस स्टैंडर्ड रिलायंस जियो ने अपने प्रीपेड रिचार्ज पोर्टफोलियो में गुपचुप तरीके से एक नया प्लान पेश किया है। कंपनी…

Realme का नया फ्लैगशिप मोबाइल Realme GT Neo 6 SE चीन के घरेलू बाजार में लॉन्च होने से…
वनप्लस नॉर्ड सीई 4 5जी भारत में लॉन्च हो चुका है और आज पहली बार देश में बिक्री के लिए उपलब्ध होगा।…

Motorola Edge 50 Pro 5G फोन भारत में लॉन्च हो गया है यह हो चुका है। यह मोबाइल अपने स्टाइल और स्पेसिफिकेशन्स…

Vivo ने अपनी Vivo V30 सीरीज को भारत समेत अन्य बाजारों में पेश कर दिया है। इसमें V30…

मोटोरोला एज 50 प्रो भारत में लॉन्च किया जाएगा. प्रीमियम लुक और फ्लैगशिप फीचर्स से लैस इस स्मार्टफोन…
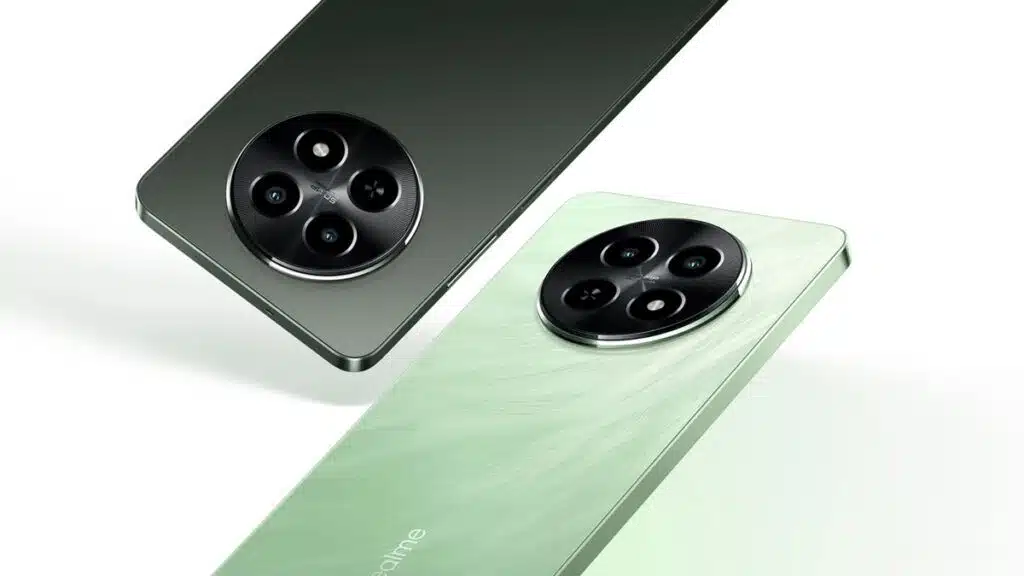
नया Realme फोन भारत में 12 हजार रुपये के बजट में लॉन्च किया गया है। कंपनी की ओर से रियलमी 12x 5G…
iQOO 91Mobile द्वारा देखे गए नए Google Play कंसोल के आधार पर वैश्विक बाजारों के लिए एक और…
शाओमी (Xiaomi) ने भारत में अपनी किफायती रेडमी सीरीज़ को और मजबूत किया है। कंपनी ने Redmi X12 को लॉन्च कर दिया…
Xiaomi के उप-ब्रांड Redmi ने इस साल फरवरी में एंट्री-लेवल A3 स्मार्टफोन लॉन्च किया था। ऐसा लगता है कि इसी महीने Redmi,…

Realme 12 सीरीज़ का धमाकेदार फ़ोन , Realme 12x 5G ने इस हफ्ते चीन में लॉन्च कर दिया है| फ़ोन की शानदार…
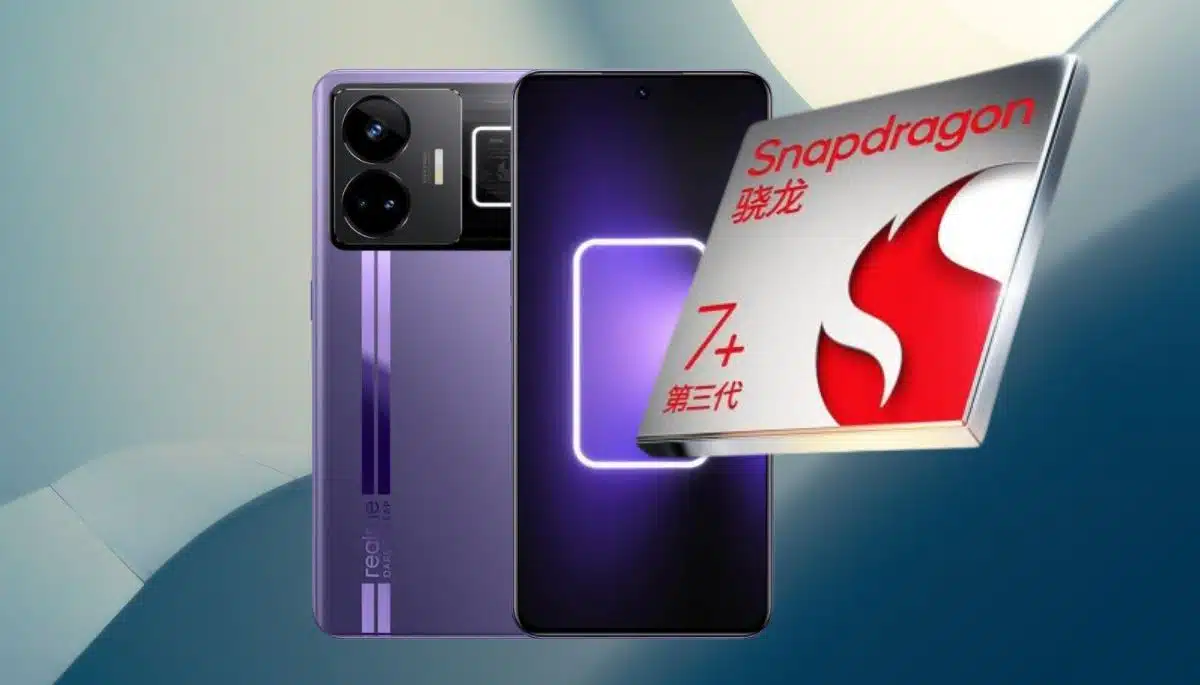
Realme GT Neo6 SE स्मार्टफोन Snapdragon 7+ Gen 3 SoC से लैस होगा, इसकी पुष्टि Realme ने खुद कर दी है। कंपनी…
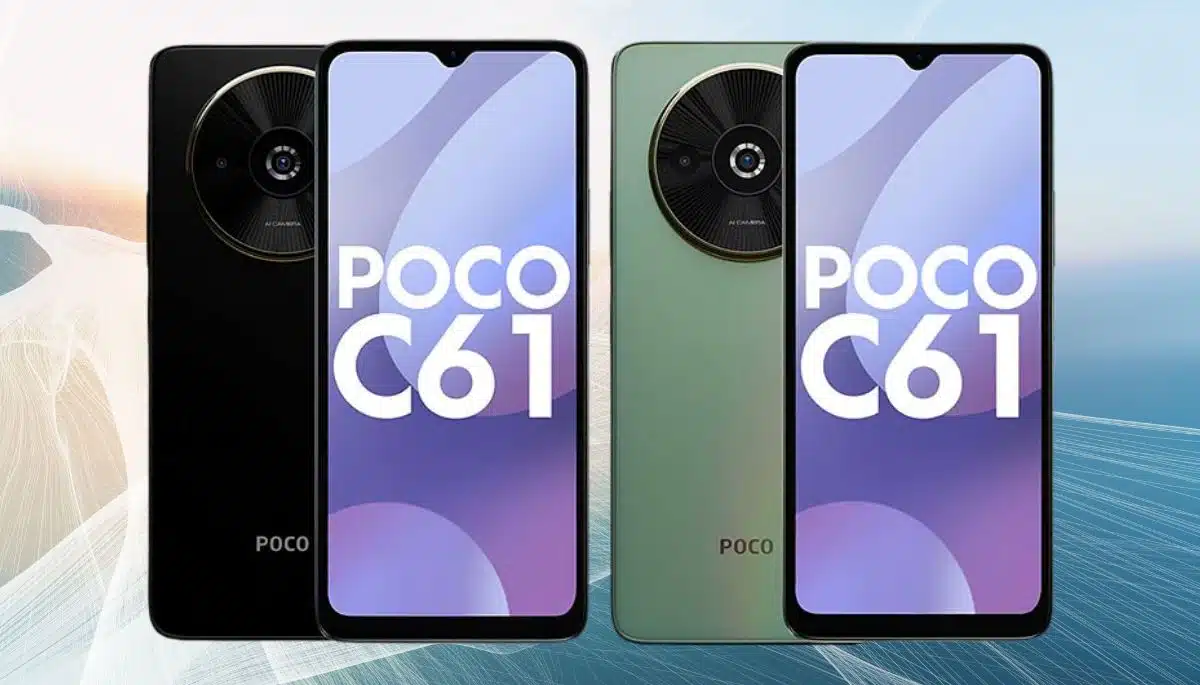
Poco अपने C-सीरीज़ स्मार्टफोन के लेटेस्ट मॉडल, पोको C61 के साथ भारतीय बाजार में प्रवेश करने के लिए पूरी तरह तैयार है।…

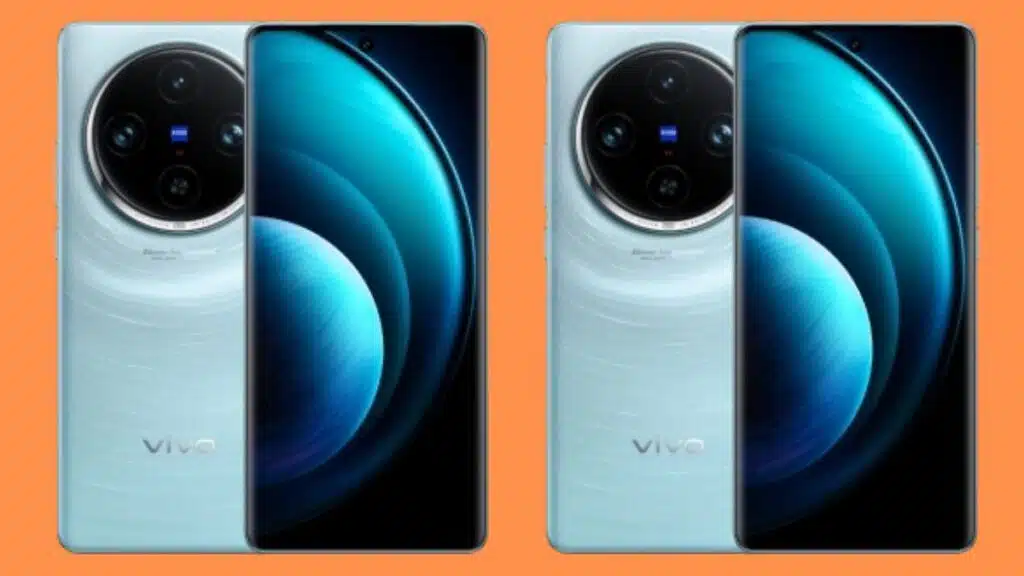
Vivo अपनी बहुप्रतीक्षित X Fold 3 सीरीज़ को लॉन्च करने के लिए पूरी तरह तैयार है। कंपनी ने आज पुष्टि की है…

टेक्नो (TECNO ) ने अपने लेटेस्ट स्मार्टफोन POVA 6 Pro के साथ एक बार फिर भारतीय बाज़ार में तहलका मचा दिया है।…
Google के प्रशंसकों के लिए एक रोमांचक खबर आ रही है! यदि आप एक किफायती Pixel फोन की तलाश में हैं, तो…
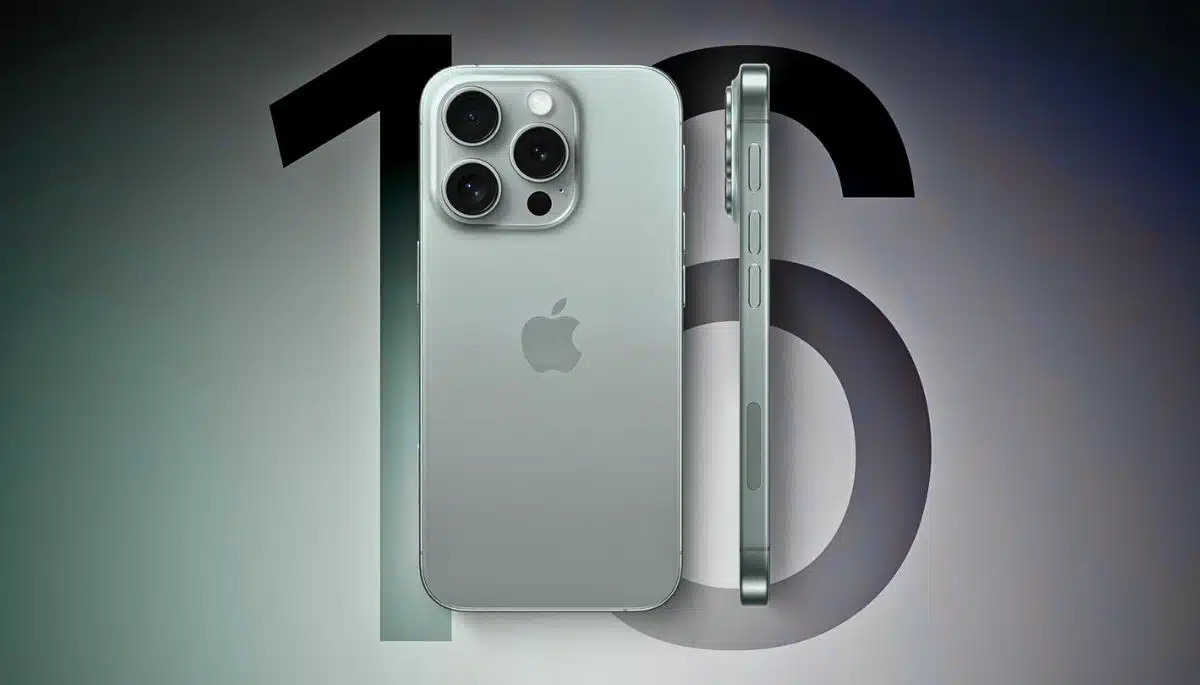
Apple द्वारा 2024 में आयोजित होने वाली Fall Event में iPhone 16 Pro लाइनअप की घोषणा किए जाने की उम्मीद है। चल…
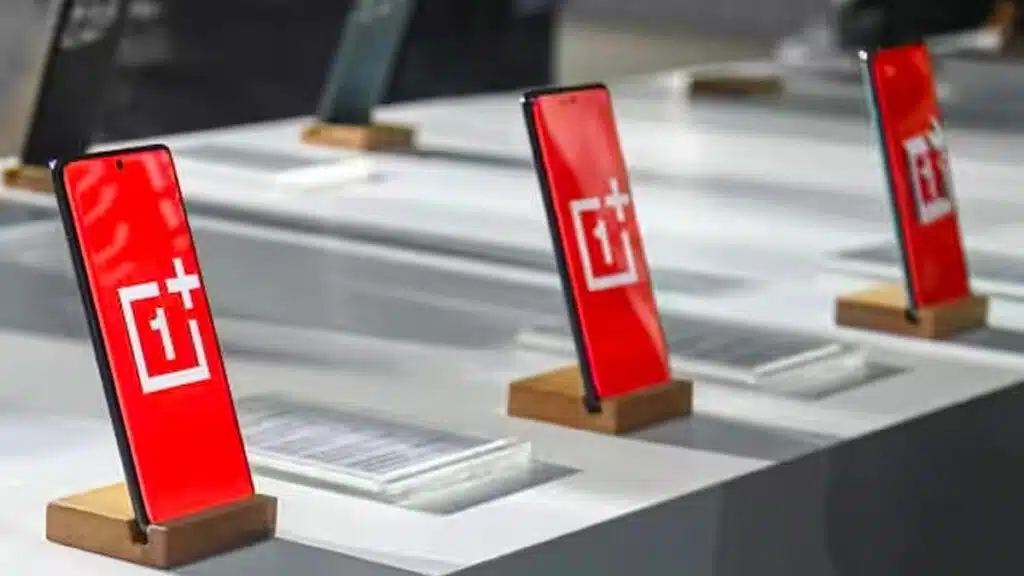
OnePlus अपने Ace 3V को 21 मार्च को लॉन्च करने की पूरी तैयारी में है। कंपनी ने इसकी जानकारी अपनी वेबसाइट और…
आज हम बात करने वाले है की Moto Edge 50 Pro के बारे में जिसे 3rd अप्रैल को इंडिया में लॉन्च किया…

टेक्नोलॉजी के शौकीनों, तैयार हो जाइए क्योंकि वीवो जल्द ही अपना बहुप्रतीक्षित स्मार्टफोन, Vivo T3 5G, भारत में लॉन्च करने वाला है!…
Xiaomi ने आज घोषणा की कि उसका नया स्मार्टफोन Civi 4 Pro 21 मार्च को लॉन्च किया जाएगा। कंपनी ने इस फोन…